I am an Unix SA and had been from quite a some time and used to work with my Windows Desktop in office and Linux Laptop at home, but during this lockdown I had been left with no choice but to work primarily on a Windows Laptop all the time, I really did not get much time to start my working and development environment, which also begs me to write an ansible playbook, which is for some later day blog. But here is the guide on which I would possible write my Playbook to install python and set thigs up.
Prerequisites:
A Windows machine
Python installer (if you are the admin of the laptop then all good, otherwise installing this without admin account is another level challenge)
Knowledge of working with Windows Command Prompt. (Yes this is going to be totally different that working with Linux Command Prompt)
The setup is quite simple, follow the steps below or just copy and paste all even that is all good.
I am planning to use Python 3.8.3 installed on to my system.
To check if python is installed on your laptop/workstation or not just type on the cmd prompt from the start menu or press “Win + R” -> “cmd”.
Once the command prompt is open, type python on the c: prompt
you should see something like in the screenshot .
Type exit () to come out of the prompt, usual Linux “Ctrl +d” will not work in here. Windows has its own limitations.
Next is to create a virtalenv, where we can do your project work.
I have plans to make a video of this, which I will do sometime sooner for setting up python and virtualenv in windows. #TODO
Today I was struggling to work on python virtual environment and realised that running a Python Virtual env in windows is not as simple and easy as compared to Linux, the difficulty here is attributed to two major things.
How to activate the virtual env (including installing and setting up python)
Where goes your virtualenv
Unlilke Linux, where the projects directory is in my home dir, in windows it could possible be technically anywhere if you are the only user of your system. So I decided to install Ubuntu on my windows Laptop. I have heard earlier that Ubuntu comes compaitable with Windows 10. Installing and settingup Ubuntu on Windows is fairly easy but Before i jump on telling how you should set up Ubuntu on Linux here is my quick guide of setting up python development environment on windows.
To Setup Ubuntu Desktop Let’s quickly go to Microsoft Store installed on your windows machine and Search for Ubuntu – I got the latest Ubuntu image as Ubuntu 20.04
Downloading Ubuntu doesn’t really make it work. We need to do some tweaking with our windows machine, before we can actually launch Ubuntu Linux.
While I clicked on the Launch Button, I got this error
Here we need to enable the Linux Subsystem for Windows, a detailed guide on how to enable the subsytem is provided by Microsoft here.
Considering the situation the Indian Businesses are right now in Facebook has offered to support small businesses which are facing challenges due to COVID-19. As part of their commitment to small businesses, they have announced a USD $100 million grant programme to support up to 30,000 eligible small businesses in more than 30 countries including India. Applications for this program are now open in India.
Facebook invites to apply for a grant if your business meets the following eligibility requirements:
Have experienced challenges from COVID-19
Have between 2 and 50 employees as on January 1, 2020
Have been in business for over a year
Be a for-profit company
Be located in or near Facebook India offices: New Delhi, Gurugram, Bengaluru, Hyderabad, Mumbai
The application deadline in India is 11:59 PM on September 21, 2020
For more details, please visit the Facebook Small Business Grants Programme website.
AWS Instructors bring the learning to you live and interactive, for our final complimentary classes in July with new classes starting August. Foundational and Specialty Solutions Training for Partner (STP) Courses are open to everyone, including non-technical roles. Register today and share with your teammates.
Note for this course you will be directed to AWS Solutions Training for Partners: Tailored.
Our accreditation, business, and technical training designed specifically for APN Partners are available on-demand online. With our AWS free digital training, you can get started with APN Partner training solutions at your convenience.
Our AWS Cloud Practitioner exam is now available to take in the comfort of your home or office through online proctoring. With this added convenience and flexibility, it’s now easier than ever to show your cloud skills are backed by an AWS Certification.
With years working with a variety of editors(vim, pico, nano, emacs). I find emacs to be capable of tasks such as text-editing, IDE, IRC, Organizer, mail client, source code management; yes emacs can do all these things with ease and is good at doing all of these.
I do not mean that other editors can’t do the things which emacs can, and really do not want to start an editor war over it, but the ease of doing things with emacs outweighs other editors.
The text editor comes with full-fledged documentation for common tasks for almost everything you want to do on your PC.
Before we go on exploring other topics for emacs, let’s start with knowing the emacs help system better.
emacs is an acronym for Editor MACros has macros been written within emacs for some common tasks and is available to anyone for writing macros for their repetitive tasks. In my later blogs, we will pick more on macros.
Just for an overview, in emacs, A keyboard macro is a sequence of keys. For example, if you want to type C-n M-d C-d forty times, you can define a keyboard macro to do C-n M-d C-d, and then executing it 39 more times.
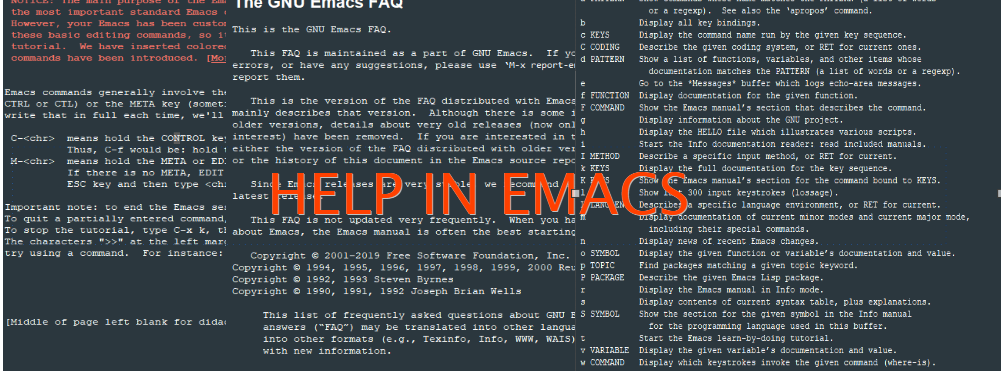
Emacs has the most robust help system available and all its help is available through a prefix of ‘C-h’ or F1. To know more on what is ‘C-‘ and ‘M-‘ in emacs please refer to my 30 Days emacs challenge.
Quickly find help in Emacs with its online documentation.
The Landing page, if you are very new: C – h t (opens the Emacs Tutorial)
Help on any function: F1 f function name
Help on summary of help commands: F1 F1
Help for topics: C – h a
Help on the topic in the Emacs index shows the first result: C – h i d m emacs <RET> i topic <RET>
Similar, but searched the text, instead of just indexes: C – h i d m emacs <RET> s topic <RET>
Emacs FAQ: C – h C -f
Available Emacs packages: C – h p
Every emacs command has a name that is used as mapped with key bindings. Most emacs commands don’t have key bindings so the only way to learn them is to use them as commands, by emacs convention all the commands will consist of one or more words separated by ‘-‘. For eg. auto-fill-mode or manual-entry. So to enter a command, type M-x “enter the name of the command” RET (to execute), In case you change your mind to cancel the command pressing C-g (to cancel) will immediately cancel the command and put you into the main buffer.
Similarly apropos are the commands which may answer certain questions as “what are the commands for working with files?”. specifying an apropos pattern such as a word, a list of words, or regular expressions, each apropos command display a list of item that matches the pattern in a separate window.
Commands
Description
C-h a *TOPICS*
Searched for the command whose name matches the arguments
C-h i d m *emacs* RET i *TOPIC* RET
This searches for the topic in the indices of the online emacs manual, and prints the first match
‘,’ to jump to the subsequent matches, we can also use regexes here.
C-h i d m *emacs* RET s *TOPIC* RET
Same as above, but instead of just searching the indices, it searches the manual too.
C-h C-f
Displays the FAQ.
C-h p
Display all the emacs package based on the keywords.
C-h b
Display all active key bindings
C-h c *key*
show the name of the command it runs. (describe-key-briefly)
C-h d *TOPICS* RET
Display command and variables whose documentation matches the topic. (aprops-documentation)
C-h e
Display **Message** Buffer
C-h f *function* RET
Display documentation on the LISP function (describe-function)
C-h h
Display the ‘HELLO’ file
C-h i
Run info, the GNU documentation browser, the complete emacs document is available online in info
C-h key
Display the name and the documentation of the command that the key runs. (describe-key)
C-h l
Description of last 300 keystrokes. (view-lossage)
C-h f
Display documentation of the current major mode. (describe-mode)
C-h n
Display news of recent changes. (view-emacs-news)
C-h p
find packages by topic keyword. ((finder-by-keyword)
C-h r
Display the emacs manual. (info-emacs-manual)
C-h s
Display the current contents of the syntax table, with an explanation of what they mean
(describe-syntax)
C-h t
enter the emacs interactive tutorial. (help-with-tutorial)
C-h v *var* RET
Display the doc for the LISP variable var. (describe-variable).
C-h w *command* RET
Show which keys run the command named command. (where-is)
C-h C *coding* RET
Describe the coding system. (describe-coding-system)
C-h C RET
Describe the coding system currently in use.
C-h F *COMMAND* RET
Enter Info and go to node that documents emacs command *command*. (info-goto-emacs-command-node)
C-h I *method* RET
Describe the input *method*. (describe-input-method)
C-h K *key*
go to the key-sequence document in Info. (Infp-goto-emacs-key-command-node)
C-h L *Language-env* RET
Display info on the character set, coding system, and input methods. (describe-language-environment)
C-h S *Symbol* RET
Display the info on the symbol *symbol* based on the programming mode you are using (info-lookup-symbol)
C-h .
Display message for the special text area. (display-local-help)
**Apropos**
C-h a *pattern* RET
Search for a command whose names match the pattern.
M-x apropos RET *pattern* RET
Search for functions(both interactive and non-interactive) and variables whose name matches the *pattern*
M-x apropos-variable RET *pattern* RET
Search for user-option variables matching the *pattern*.
M-x apropos-value RET *pattern* RET
search for function whose definition match *pattern* and variable whose value matches *pattern*
C-h d *pattern* RET
search for function and variable whose documentation string matches *pattern*
**Emacs help files**
C-h C-c
Describe the emacs copying condition. rules for copying and redistributing emacs. (describe-copying)
C-h C-d
Debugging in emacs. (view-emacs-debugging)
C-h g
Display general information about GNU Project. (describe-gnu-project)
C-h C-m
How to order printed copies. (view-order-manual)
C-h C-n
To see the emacs news and listing of new features. (view-emacs-news)
C-h C-o
How to get the new version. (describe-distribution)
C-h C-p
Tells us about the known emacs problems. (view-emacs-problems)
C-h C-t
Display the emacs TODO list or things that need to be done. (view-emacs-todo)
C-h C-w
Describe warranty. (describe-no-warranty)
Commands work in Help mode
SPC
Scroll forward
DEL
Scroll backward
TAB
Move point forward to next cross reference
S-TAB
Move point backward to the previous reference
RET
Follow a cross reference point.
C-c C-c
Show all documents of the symbol at the point.
I am convinced the emacs has got the most extensive documentation an editor could ever have, the above table tries to cover as many things as possible but I am pretty sure, I would have definitely missed things, like this that once on IRC I had been suggested some lisp code to quickly take me to the help page and I missed it. Well, on many modern keyboards F1 works well for help.
I tried to cover as much help command as possible in today’s blog posts which will come in handy for daily usage. Will soon be publishing text editing with emacs.
Today, after so many days of starting my blog, worked to set it up properly with colours and removing default widgets and setting some of my own. Though its not the best, but it looks a little owned, instead of the previous default one, Which was just like that, and looked kind of amateurish, Though I am sure, it must have been very difficult with the people to make something so simple, still it was the default and not customised as per my requirements. Hence here is the new look, not Smart, but not Bad either 😉
wonder who has build such a wonderful system, which eventually started to take on our usual currency, the best part is it being a global money, than just specific to certain countries, at-least we can save so much when doing the exchanges.
Well, i am just going to write a brief about how I made this post work.
First of all, let me point you to this wonderful link, which list down the way to make emacs and org-mode work with wodpress and make this post possible.
So, here what i did.
I had this melpa and elpa repostiory already configured. so quickly did M-x package-install return; org2blog return
some quick configuration changes in my .emacs file to incorporate the org2blog settings and wordpress cofiguration.
To add origin git remote add origin https://github.com/<username>/<repository name>.git
— Please do not add the “< >” while using the above command. for e.g. https://github.com/omps/webdevel.git
use the origin as SSH and without authentication. you can follow the stack overflow question on this. or can just add “git remote add origin ssh://git@github.com/<username>/<repository name>.git
To push to the repository. git push origin master If you have created the directly locally and wanted to push it to the github.com server, you may need to force the origin master. i did as “git push origin master –force”, please note that this may wipe your existing content.
$ find . -type f -print0 | xargs -0 stat -c’%Y :%y %12s %n’ | sort -nr | cut -d: -f2- | head
Will go through all the files in the directory specified, uses `stat` to print out last modification time, then sorts numerically in reverse, then uses cut to remove the modified epoch timestamp and finally head to only output the last 10 modified files.
1. To tweet.
2. To Blog.
3. As a personal todo and task taker using org-mode.
4. As an IRC Client.
5. As a text based web browser.
6. As an MUA(Mail User Agent).
7. As a shell terminal.
8. As a file manager.
9. Using github as version control.
10. Last but not the least as an editor, to code and do things amazingly. Take the tour.