Author: Om Prakash Singh

  • Financial Wisdom

    The importance of Financial knowledge and maintaining financial discipline and hygiene is critical in today’s times.

    “omps.in is reader-supported and is a participant in the Amazon Associates Program. When you buy through links on our site, we may earn an affiliate commission.

    I am an IT professional and work on technology, I have met folks & friends from my stream of work who are not very well aware of the money caveats, this happens mainly because we do not understand the nitty-gritty of the taxes, investments, and savings, we solely rely on the salary we earn and usually take financial advice from friends and colleagues for investments. 

    We fail to understand the importance of financial knowledge till it become very late in life and we find ourselves in situation where we end up depending on our PPF Savings and asking loan from others. 

    This is my story and financial learning, which I am picking from the books I am reading. I am going to share tips and tricks from the books I read, to help others who are looking for financial freedom.

    Financial discipline is important, from the last 5 years I am following financial hygiene and following tips on how to save and invest and am now confident to say I somewhat have achieve financial freedom, still its a long way to go.

    The list contains part 1 of the books I am already reading, next set of books soon to follow.

    Rich Dad Poor Dad: What the Rich Teach Their Kids About Money That the Poor and Middle Class Do Not! by Robert Kiyosaki


    Buy at Amazon

    Let’s Talk Money: You’ve Worked Hard for It, Now Make It Work for Youby Monika Halan


    Buy at Amazon

    How To Be Your Own Finance Planner in 10 Steps (Master Your Financial Life Book 2) by Manish Chauhan (Kindle Edition)


    Buy at Amazon

    The Richest Man in Babylon by George S Clason (Kindle Edition)


    Buy at Amazon

    The Psychology of Moneyby Morgan Housel (Paperback)


    Buy at Amazon

    The Victory Project: Six Steps to Peak Potential by Saurabh Mukherjea, Anupam Gupta (Hardcover) | Offered by Cloudtail India


    Buy at Amazon

    Romancing The Balance Sheet-Second Edition by Dr Anil Lamba (Hardcover)


    Buy at Amazon

    HDFC Bank 2.0 by Tamal Bandyopadhyay (Paperback) 


    Buy at Amazon

    Common Stocks and Uncommon Profits and Other Writings (Wiley Investment Classics) by Philip A. Fisher, Kenneth L. Fisher (Kindle Edition) 


    Buy at Amazon

    Stocks to Riches: Insights on Investor Behaviour by Parag Parikh (Paperback) 


    Buy at Amazon

  • Jupyter Notebook

    Jupyter Notebook

    I have been programming with python for quite some time and been using Jupyter notebook for some data science projects, I like the UI and Jupter notebook provides with a web-based interactive development environment for python notebooks, code, and data.

    There are many blogs which will help you setup your notebook environment and itse really not difficult either and can be summarised in the following 4 commands

    $ python -m venv jupyter
    
    $ source jupyter/bin/activate
    
    $ pip install jupyter
    
    $ jupyter notebook

    Recently I tried to explore more on how I can possibly start jupyter notebook on my Android Device. The command does work on Android, but it comes with caveats. Here is somewhat quick detailed post on setting up Jupyter Notebook on Android Phone/Tablet.

    To run jupyter notebook, we require a working python development environment on Android.

    There are many ways to do this. I choose and prefer to use Termux App.

    Termux is an Android terminal emulator and Linux environment app that works directly with no rooting or setup required. A minimal base system is installed automatically – additional packages are available using the APT package manager.

    – https://termux.com

    I have taken this install instruction from the stackoverflow answer with my amendments to it.

    1. Install the Termux app.
    2. Open Termux, then enter/run the following commands in the prompt:
      $ apt install clang python fftw libzmq freetype libpng pkg-config libcrypt
      $ LDFLAGS="-lm -lcompiler_rt" pip install jupyterFinally, test the notebook out by running:
    3. $ jupyter notebook
      

    When you run jupyter notebook, a notebook server starts up and dumps some information to stdout. When you see the line:

    Copy/paste this URL into your browser when you connect for the first time,
    to login with a token:

    copy the following URL, paste it into the browser on your device, and then hit go. You should end up with something that looks like this:

    I tested these instructions out a Samsung Galaxy Tab 10 2020 (wifi) running stock Android 10 (10).


    I tried to provide as much details as pososble, but in case if i missed anything please let me know in the comments.


  • Emacs – 30 Days Challenge

    Emacs – 30 Days Challenge

    This is my learning journey to learn emacs in the next 30 Days. I am going to share my learning on this blog page.
     
    Below is the outline of the content I am planning to touch upon during my 30 Days challenge.
    • Day 1: Welcome to emacs
    • Day 2: Help in Emacs

    “ Emacs is the extensible, customisable, self-documenting real-time display editor.”

    – Emacs Manual

    Emacs can control OS subprocesses, helps in indenting programs, perform functions on many files at once and act as a simple text editor.

    Emacs can be easily altered to behave in a certain way as you want and is highly customizable. Advanced users of emacs can go beyond simple customization and can create entirely new commands. These new commands are simple programs written in LISP and are also known as macros.

    Downloading

    Most of my writing I do mainly with a Mac Pro, so I downloaded the mac version of emacs, there are multiple emacs variants present, but I preferred vanilla emacsformacosx, which gives me enough room for customization as per my needs.

    The commands and helps mentioned in my blogs will work on all the emacs variants regardless of your choice of OS.

    I downloaded MAC OS X from http://emacsformacosx.com/.

    In a lot of blogs and on #emacs IRC channel, people recommend using vanilla emacs while learning emacs. Customized variants of emacs come with pre-built commands which limits the learning curve.
    It is much easier to download and install emacs on Mac OS X. Download the latest version of emacs. Double click on the installer and follow the instructions.

    For Windows and Linux you can download GNU Emacs releases from a nearby GNU mirror; or if automatic redirection does not work see the list of GNU mirrors, or use the main GNU ftp server.

    GNU Emacs development is hosted on savannah.gnu.org.

    Working with emacs

    • Starting the editor: once installed start emacs from Launchpad -> emacs, clicking on which took me to the editor in its full glory, with a nice welcome message with a link to the manual and the beginner emacs tutorials to get a start working with emacs and to quickly get help in emacs “C-h (Hold down Ctrl and Press h)
    emacs welcome screen
    When starting the emacs editor for the first time, the emacs welcome screen

    Few things to note and which are global to emacs.

    We are following the standard emacs documentation while learning emacs to do our tasks, for the rest of the blog and my future emacs/non-emacs related posts, I am going to use Control Key as ‘C’. Alt or Esc Key as ‘M’ or referred in the document as meta key. Shift as ‘S’.

    Control keys are the “CTRL” keys on your keyoboard, usually on the bottom-left and bottom-right(near the shift key) keys.

    Meta Keys are “ALT” or “ESC” key on your keyboard.

    Shift Keys are the “SHIFT” keys on the left(below caps lock key) and right (below enter key) on your keyboard.

    Moving around

    Arrow keys on the keyboard can help you navigate around emacs text, it works similar to other text editors. Still, it is important that you learn the CTRL and Meta(ALT/ESC) key bindings to navigate around your document/code-block.
    Examples of some common key-bindings which you will be using almost daily while working within emacs.
    Keys Movement
    C-v View next screen also as Page Up.
    M-v Move Backward one screen or Page Down.
    C-l redisplay the text with the cursor at the center of the screen.
    C-p Previous line or up arrow key.
    C-b back one character or left arrow key.
    C-f forward one character or right arrow key.
    C-n Next line or down arrow key.
    M-f Move one forward one word.
    M-b Move back one word.
    C-a Move to the beginning of the line.
    C-e Move to the end of the line.
    M-a Move to the beginning of the sentence.
    M-e Move to the end of the sentence.
    C-u to specify a repeat count. C-v and M-v are exceptions as they won’t move pages but instead will scroll to that many lines forward/backward
    C-g Kill the running command in minibuffer, or in case emacs stop responding.
    C-d Delete the next character after the cursor.
    DEL delete the character just before the cursor.
    Insert text insertion is as simple as typing it. you can use the C-u to insert text as well. for eg. C-u 10 – will insert 10 hyphens “-———”.
    M-</td> Kill the word before the cursor.
    M-d Kill the word after the cursor
    C-k Kill from the cursor position to the end of the line.
    M-k Kill to the end of the current sentence.
    C-</td> Set the mark, move around with the above keys to highlight the text.
    C-y Yank the file back.
    C-x C-f Find the file, can be used for creating a file or opening an existing file.
    C-x C-s Save the file, when you made some changes to the file and want to write the same to disk or save it.
    C-x s Save some buffers.
    C-x C-b List all the opened Buffers.
    C-x b Switch buffer around.
    C-x C-c Quit Emacs.
    These are some of the common keys for moving around while in emacs.
     
    In the beginning, it seems hard to remember these key bindings for moving around within emacs. As we go along and with practice, these key sequences will become part of daily use.
     
    As a beginner, the above chart looks intimidating, and using arrow keys is easier to move around, but we should practice adopting and try use Ctrl and Meta sequences wherever possible and become more proficient using them, in the long run, you will observe it is much easier to work with key sequences.
  • Free HTTPS for your website!!

    Free HTTPS for your website!!

    I know we are not big enterprise who can buy SSL certificates and done with it.

    For small bloggers like me and you it becomes challenging Day by Day to keep up with Google’s changing policies. Apart from Google’s policies, it is also important to keep our site secure running and ranking in Google.

    Enabling SSL on your website is another SEO trick to rank in google.

    I tried to write down the steps for setting up yourself with cloudflare and get free https, for the impatient you can directly go to the section for cloudflare.

    Google wants us to use https to rank our site, they prioritize HTTPS over HTTP and when you are hosting your personal website/blog site on Github you should use https.

    With CloudFlare DNS service and your Github custom domain this will speed up your site and make it load faster on the browser since CloudFlare is going to cache your site and service the request from the nearest cached site your site will load much faster.

    I have been at this point where I want to migrate from my Github Pages blog from http to https for the obvious advantages of using https,

    From Github blog

    HTTPS (most recognizable as the lock icon in your browser’s address bar) encrypts traffic between GitHub’s servers and your browser giving you confidence that the page you asked for is the page you’re reading, from the site you think it is, and that others can’t snoop on or modify its contents along the way.

    This led me to search google and the solution was well hidden in on one of the Github issues hence I am making this ready guide for reference.

    Github has native support for *.github.io domains from 2016. They finally enabled https support for a custom domain in 2018 partnering with Let’s Encrypt as the certificate authority.

    Benefits of using Github?

    • It’s Superfast
    • Easy to setup
    • site deployment is just a git push away.
    • and has braved the worlds biggest DDOS attack.

    Benefits of using CloudFlare

    • Speed up your site.
    • Fast, Global CDN.
    • Ensure Application Availability
    • Auto minify your site
    • custom redirect rules.

    I am assuming you have your Github account handy and now you need to go ahead and make your Cloudflare account. If you have never set up Github pages, please follow this guide to help you with.

    once ready. Let’s

    Configure Github Pages

    Go to your Github repository and settings, we need to make sure our repository using the custom domain name and using https.

    cloudflare_cname

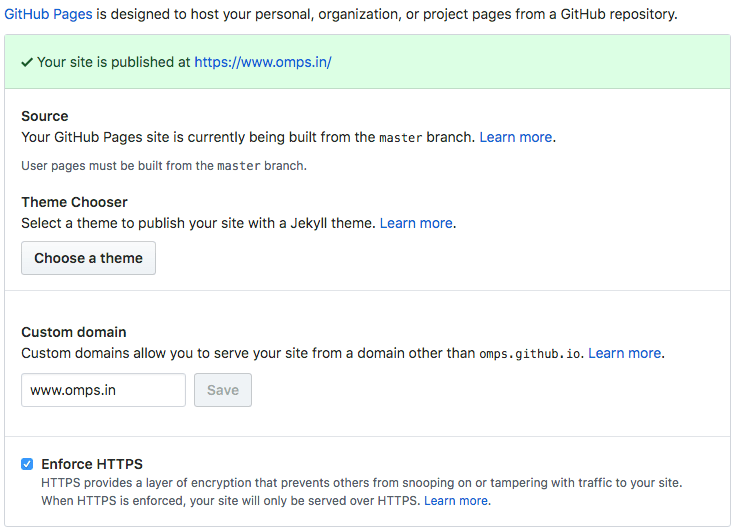
    Save. That’s it and we are done.

    Configure Hosting Providers DNS Server.

    If you are using CNAME or ALIAS records for your custom domain, you’re all set and your site should be accessible over HTTPS. If it is, and your site loads correctly over HTTPS.

    In case you are using A record Github requires you to modify your registrar’s A records to match with new IP addresses.

    If you have previously configured Github pages, you could recall that for HTTP requests GitHub uses the following IP addresses.

    1
    2
    
    192.30.252.153
    192.30.252.154
    

    and this needs to be updated with the new https record which GitHub provides as.

    1
    2
    3
    4
    
    185.199.108.153
    185.199.109.153
    185.199.110.153
    185.199.111.153
    

    and should look like this

    omps.in_a_record

    run dig command to check if the records are updated. omps.in$ dig +noall +answer omps.in omps.in. 300 IN A 104.31.70.126 omps.in. 300 IN A 104.31.71.126

    after this, you need to remove the CNAME file from your repository and do a GitHub push. re-add the cname fine and do a git push to the master. This will help refresh Github’s CNAME record.

    Configuring CloudFlare

    Login to CloudFlare and set up a new site, for our custom domain name. In the end, we need to update our hosting provider’s domain name settings to use CloudFlare DNS instead of the current ones. CloudFlare will then import all our existing configuration on to their servers.

    Just ensure that www CNAME record redirects to your GitHub pages URL. CNAME is just an alias. In this case, we tell DNS to respond address of omps.github.io whenever omps.in is queried.

    cloudflare_cname

    Forcing HTTPS

    Now that CloudFlare handles our DNS, we need to force all requests to use HTTPs. On the Crypto tab, just change the SSL option to Full. To better understand each of these options, here is a picture taken from the CloudFlare blog:

    cloudflare_flexible_ssl

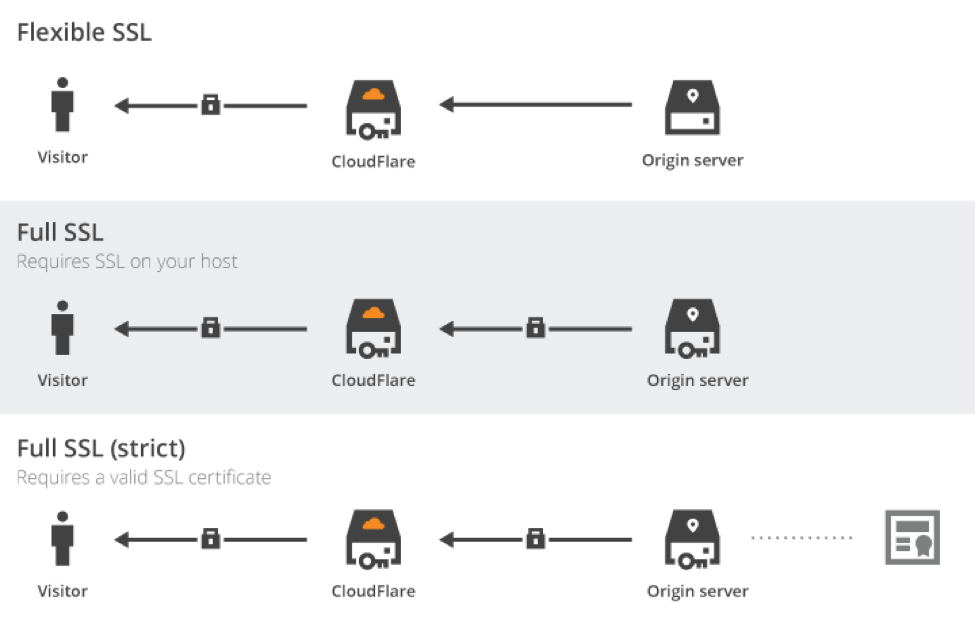
    With flexible SSL, all communications between CloudFlare servers and GitHub ones are not encrypted. Not really secured, even if your domain would be served in HTTPs.

    However, full modes encrypt all communication streams, even behind CloudFlare servers. In this case, the hosting server needs to supports SSL. We need to stay in loose mode, as GitHub won’t validate the SSL certificate with a custom domain name.

    Our site is now (depending on DNS propagation time, up to 48 hours) served in HTTPs and is compatible with faster HTTP/2.

    Force Redirection to HTTPs Version

    We are going to add three rules for our domain (fortunately, we get three free rules with the free plan):

    omps_in_page_rules

    First one enables caching on all URL, Second one redirect permanently URL without www to the one with www, Last one to force the use of https everywhere. As a result, even if we mistakenly go on http://omps.in, we will be redirected to a cached version of https://omps.in.

    Note the use of the wildcard * on all rules to match every URL. You can retrieve the value replaced by the wildcard using the regex-like [$1, $2, …] arguments.

    About CloudFlare Caching

    CloudFlare is also a CDN (Content Delivery Network). It has a lot of servers around the world and optimizes the way it delivers our data. To take advantage of it, we just had to enable caching using page rules. We can configure it more finely via the Caching tab.

    We cache every request to GitHub for 4 hours (by default). Instead, all our requests would be served by the closest CloudFlare CDN server, saving fractions of seconds of international data transit. Our static website is already blazing fast, let’s increase again its reactivity.

    As we asked for a total cache, we need to purge cached pages at each change. We can either do it using CloudFlare built-in API or manually. As I don’t publish several posts a day, I can wait a few hours before seeing my post is publicly available. Or I just purge the cache using CloudFlare user interface.

    Purging CloudFlare Cache

    Note there is also a Development Mode feature. It simply disables the cache layer, allowing you to check in realtime all your changes. It is especially useful if you need to debug in production. But nobody does this kind of thing, right? 😉

    Now once again we collect the CloudFlare nameservers,

    cloudflare_ns_servers

    go back to our hosting provider and update the NS records.

    update_registrar_ns_records

    While going through this is pretty simple, I must warn you that it will take around 24/48 HRS for the changes to propagate fully, so don’t be impatient and wait. Once your changes are reflected, you would see a much faster response.

  • How to Setup a Personal Static blog with Github Pages

    How to Setup a Personal Static blog with Github Pages

    What is Github

    Github is a code hosting platform for collaboration and version control using git which is quite similar to SVN and Mercurial.

    Github allows us to work with other developers together on the projects.

    You can sign up for github at https://github.com

    Github_account

    Essential components of Github are:

    1. Repositories
    2. Branches
    3. Commits
    4. Pull Request
    5. Git (The version control software Github is built on.)

    To learn more about git do visit the git-scm page.

    What is Github pages.

    GitHub Pages is a static site hosting service designed to host your personal, organization, or project pages directly from a GitHub repository.

    Basically with Github pages you can host your static HTML site, like your portfolio, your blog on an information site, which do not require a lot of content-changes very frequently.

    GitHub Pages is a static site hosting service and doesn’t support server-side code such as, PHP, Ruby, or Python.

    We can use programming languages such as Ruby and Python to generate static sites, which can then be pushed into your repositories.


    You must not use github pages as a free hosting service, their term place certain usage limit as follows:

    • GitHub Pages source repositories have a recommended limit of 1GB .
    • Published GitHub Pages sites may be no larger than 1 GB.
    • GitHub Pages sites have a soft bandwidth limit of 100GB per month.
    Any commercial transaction or commercial software on GH Pages restrain a soft limit. E-commerce sites, online businesses and websites with commercial transactions falls into this category.

    imitations

    GH Pages sites are subject to the following usage limits:

    • The source repositories hosting your blog have a recommended limit of 1GB .
    • Published sites cannot be no larger than 1 GB.
    • The sites will have a soft bandwidth limit of 100GB per month.
    • And your site will only be build for 10 times in an hour, if you are using Jekyll or pelican as static site generator.

    While you have hosted your content on the GitHub pages. Please also make sure you follow these guidelines and must refrain from:

    • Content or activity that is illegal or otherwise prohibited by our Terms of Service or Community Guidelines
    • Violent or threatening content or activity
    • Excessive automated bulk activity (for example, spamming)
    • Activity that compromises GitHub users or GitHub services
    • Get-rich-quick schemes
    • Sexually obscene content
    • Content that misrepresents your identity or site purpose

    Why Github Pages

    GitHub pages uses static sites technically, a static website is only HTML and CSS and doesn’t involve scripting. To change the content which appears source code needs to be edited directly. In simple words, the content of the website will remain same for every visit whereas for dynamic sites the content will keep on changing. For e.g. the news feed of facebook is a dynamic site, but book review site can be a static site, since the content remains constant for somtime. There are many reasons which makes a static site desirable than a dynamic site as follows:

    1. Security

    Static websites are usually safe when compared to dynamic websites. APIs and Java script handle the dynamic functions of Static sites, eliminating the risk of getting hacked.
    Dynamic website but are more prone to get hacked due to many content sources and plugins.

    A WP WhiteSecurity report states that about 70% of WordPress sites are at risk of getting hacked by malicious hackers because of lack of maintenance and upgrading. Ugh, scary.

    2. Reliability

    At times we must have come across this error message “The connection could not be established“. This happens because of errors with databases.
    Service basic HTML files makes it a lot easier to host them anywhere with ease like on a CDN.
    During an attack on the server, the request for static site redirects to another closest node, whereas dynamic sites could go down for few hours.

    3. Speed

    The absence of middleman/database makes the static site much more speedy and easy to load. A static site is ten times faster than a dynamic site that is built with a CMS. Another reason for a static website to run faster is that it can be served from the node closest to the browser.

    According to research by Kissmetrics, about 47% of people expect the website to load within 2 seconds, and a whopping 40% of people will not wait for the website to load for longer than 3 seconds. Hence, getting a static website also helps in getting more traffic by reducing abandonment rate caused due to slow loading.

    Page Load Time

    Hosting and Price

    Static websites have basic HTML files which require less space making the hosting of these websites cheaper to that of dynamic websites. Organizations with static website save up on the costs and channel those resources to integrate Git or automated builds to incorporate the latest changes in the system.

    Scalability

    What to do when your website is finally up and running? Handling massive traffic on a dynamic website might be a cumbersome process as it requires complex code playing on the server. Static websites which are only HTML files can be easily scaled up by just increasing the bandwidth.

    Technological advancements.

    There was a time when online store websites would have to rely on dynamic websites for their organization and integrate those complex coding and deal with tedious scripting.

    With tools like Magento, it is possible to have a static website for shop-centric businesses. A Java-script based shopping cart, called Snipcart, integrates e-commerce site’s functionalities to a static website, eliminating the need for dynamic websites. Snipcart dashboard can manage sales and product inventories, and its API can be integrated with shipping service providers and inventory management software systems as well.

    With some static generators and static website hosting platforms that allow Github integration, global CDN, SSL certificates along with free custom domains. Hosting providers such Netlify, go up the notch and even deal with redirects such as 404 errors, proxies, and even password protection.

    Therefore, it is safe to say that static websites have made a terrific comeback and they are here to stay with more advantages than drawbacks. As a website is a digital face of the business, organizations must take into consideration all the factors and necessities of their business website and must assess all the new tools and platforms before making a website.

    online stores

    What are the requirements for hosting on github pages

    • You need to have a github account, register here.
    • enable gh-pages for your repository.
    • you can access the repository as .github.io

    How to Do GitHub hosting.

    Create a repository

    Head over to GitHub and create a new repository named username.github.io, where username is your username (or organization name) on GitHub. Create repository If the first part of the repository doesn’t exactly match your username, it won’t work, so make sure to get it right.

    Clone the repository

    Go to the folder where you want to store your project, and clone the new repository:

    1
    
    ~ $ git clone https://github.com/username/username.github.io    
    

    Hello World

    Enter the project folder and add an index.html file:

    1
    2
    
    ~ $ cd username.github.io
    ~ $ echo "Hello World" > index.html
    

    Push it

    Add, commit, and push your changes:

    1
    2
    3
    
    ~ $ git add --all
    ~ $ git commit -m "Initial commit"
    ~ $ git push -u origin master
    

    …and you’re done!

    Fire up a browser and go to https://username.github.io.

    Once this is done learn to set your custom domain.Github Pages

  • Using Ipython

    I started to move along with using python 3, I want my python shell for to be working properly. As many of us must be aware, Python Shell is not really a very interactive prompt and most of the time, while I am working with Python, I tend to install Ipython as an alternative to work more flexibly with Python Shell.

    When I downloaded and installed python3. I do not get ipython, this needs to be installed separately.

    The pip3 install ipython3 didn’t came of much help.

    As, I am having multiple versions of python running on to my system, one is the native python version 2.7.11 which by default came with my OS, other python version 3.5.1 which I had explicity downloaded for using python3.

    Googling around did helped much either, and the solution was pretty simple for implementation so I am documenting here in case anyone needs a quick help.

    $ which ipython
    /usr/local/bin/ipython
    $ which python3
    /usr/local/bin/python3
    
    cp /usr/local/bin/ipython /usr/local/bin/ipython3
    

    edit the ipython3 file.

    #!/usr/local/bin/python
    
    # -*- coding: utf-8 -*-
    import re
    import sys
    
    from IPython import start_ipython
    
    if __name__ == '__main__':
        sys.argv[0] = re.sub(r'(-script\.pyw|\.exe)?$', '', sys.argv[0])
        sys.exit(start_ipython())

    Change the shebang which is #!/usr/local/bin/python to #!/usr/local/bin/python3

    Save the file.

    run ipython3, I am assuming /usr/local/bin is in your system path.

    $ ipython
    Python 3.5.1 (v3.5.1:37a07cee5969, Dec  5 2015, 21:12:44) 
    Type "copyright", "credits" or "license" for more information.
    
    IPython 4.2.0 -- An enhanced Interactive Python.
    ?         -> Introduction and overview of IPython's features.
    %quickref -> Quick reference.
    help      -> Python's own help system.
    object?   -> Details about 'object', use 'object??' for extra details.
    
    In [1]:

    What we basically did, was copied the original ipython file which was being used by python version 2 and ensured that to work with python3 by changing its shebang line, which tells ipython to use the desired python version. In case, if you do not already have ipython installed then pip install ipython will just work, post your python 3 installation.

    Though this is a quick hack, but really not an ideal solution.

    Try and use virtual environment in case of multiple python installations.

  • Python Virutal Environment on Windows

    I am an Unix SA and had been from quite a some time and used to work with my Windows Desktop in office and Linux Laptop at home, but during this lockdown I had been left with no choice but to work primarily on a Windows Laptop all the time, I really did not get much time to start my working and development environment, which also begs me to write an ansible playbook, which is for some later day blog. But here is the guide on which I would possible write my Playbook to install python and set thigs up.

    Prerequisites:

    • A Windows machine
    • Python installer (if you are the admin of the laptop then all good, otherwise installing this without admin account is another level challenge)
    • Knowledge of working with Windows Command Prompt. (Yes this is going to be totally different that working with Linux Command Prompt)

    The setup is quite simple, follow the steps below or just copy and paste all even that is all good.

    I am planning to use Python 3.8.3 installed on to my system.

    To check if python is installed on your laptop/workstation or not just type on the cmd prompt from the start menu or press “Win + R” -> “cmd”.

    Once the command prompt is open, type python on the c: prompt

    Display python version on Windows

    you should see something like in the screenshot .

    Type exit () to come out of the prompt, usual Linux “Ctrl +d” will not work in here. Windows has its own limitations.

    Next is to create a virtalenv, where we can do your project work.

    I have plans to make a video of this, which I will do sometime sooner for setting up python and virtualenv in windows. #TODO

    c:\>mkdir projects
    
    c:\>cd projects
    
    c:\projects>python -m venv my_first_python_program
    
    c:\projects>cd my_first_python_program
    
    c:\projects\my_first_python_program>dir
    
    c:\projects\my_first_python_program>cd Scripts
    
    c:\projects\my_first_python_program\Scripts>activate
    
    (my_first_python_program) c:\projects\my_first_python_program\Scripts>
    How to setup a virtual env in windows 10
    Steps to steps virtual env in windows

    Once you setup and activated the environment, the environment name is added as the prefix of the prompt.

    Till the time, you do not “deactivate” your virtual environment. you are not going make any changes to your core operating system libraries.

    Now, go download the pip libraries and modules and try out new things.

    (my_first_python_program) c:\projects\my_first_python_program\Scripts>pip install jupyter

    Finally, Coming out of the virtual enviromnet

    (my_first_python_program) c:\projects\my_first_python_program\Scripts>deactivate
    
    c:\projects\my_first_python_program\Scripts>

    Thank you for reading and bearing my adventours. 🙂

  • Ubuntu on Windows

    Today I was struggling to work on python virtual environment and realised that running a Python Virtual env in windows is not as simple and easy as compared to Linux, the difficulty here is attributed to two major things.

    • How to activate the virtual env (including installing and setting up python)
    • Where goes your virtualenv

    Unlilke Linux, where the projects directory is in my home dir, in windows it could possible be technically anywhere if you are the only user of your system. So I decided to install Ubuntu on my windows Laptop. I have heard earlier that Ubuntu comes compaitable with Windows 10. Installing and settingup Ubuntu on Windows is fairly easy but Before i jump on telling how you should set up Ubuntu on Linux here is my quick guide of setting up python development environment on windows.

    To Setup Ubuntu Desktop Let’s quickly go to Microsoft Store installed on your windows machine and Search for Ubuntu – I got the latest Ubuntu image as Ubuntu 20.04

    Ubuntu 20.4 in microsoft store

    Downloading Ubuntu doesn’t really make it work. We need to do some tweaking with our windows machine, before we can actually launch Ubuntu Linux.

    While I clicked on the Launch Button, I got this error

    Here we need to enable the Linux Subsystem for Windows, a detailed guide on how to enable the subsytem is provided by Microsoft here.

    Step 1 – Enable the Windows Subsystem for Linux

    Open PowerShell as Administrator and run:

    dism.exe /online /enable-feature /featurename:Microsoft-Windows-Subsystem-Linux /all /norestart

    Step 2 – Enable Virtual machine feature

    dism.exe /online /enable-feature /featurename:VirtualMachinePlatform /all /norestart

    and thats it. Though i later on went ahead and got WLS2 enabled. The command and guide for that also given with the above document from Microsoft.

  • Facebook for Business Applications for grants are now open in India

    Considering the situation the Indian Businesses are right now in Facebook has offered to support small businesses which are facing challenges due to COVID-19. As part of their commitment to small businesses, they have announced a USD $100 million grant programme to support up to 30,000 eligible small businesses in more than 30 countries including India. Applications for this program are now open in India.

    Facebook invites to apply for a grant if your business meets the following eligibility requirements:

    • Have experienced challenges from COVID-19
    • Have between 2 and 50 employees as on January 1, 2020
    • Have been in business for over a year
    • Be a for-profit company
    • Be located in or near Facebook India offices: New Delhi, Gurugram, Bengaluru, Hyderabad, Mumbai

    The application deadline in India is 11:59 PM on September 21, 2020

    For more details, please visit the Facebook Small Business Grants Programme website.

    View Details and Apply

  • Free Amazon Web Services Courses and Trainings

    COMPLIMENTARY VIRTUAL TRAINING IN JULY AND AUGUST

    AWS Instructors bring the learning to you live and interactive, for our final complimentary classes in July with new classes starting August. Foundational and Specialty Solutions Training for Partner (STP) Courses are open to everyone, including non-technical roles. Register today and share with your teammates.

    Note for this course you will be directed to AWS Solutions Training for Partners: Tailored.

    Foundational Course Speciality Courses
    AWS Business Professional Bootcamp
    Monday, Jul 27 – Register »
    Monday, Aug 3 – Register »
    STP: Migrating to AWS
    Technical: Thursday, Aug 6 – Register »
    Business: Friday, Aug 21 – Register »
    AWS Technical Professional Bootcamp 
    Friday, Jul 31 – Register »
    Tuesday, Aug 4 – Register »
    AWS Cloud Practitioner Essentials
    Wednesday, Aug 5 – Register »
    Monday, Aug 10 – Register »
    STP: APN Technology Partners Co-Selling with AWS
    Business: Thursday, Jul 30 – Register »
    STP: Data Analytics on AWS *NEW*
    Business: Tuesday, Aug 11 – Register »
    STP: Machine Learning (ML) on AWS for ML Practitioners

    Technical: Wednesday, Jul 29 – Register »


    ON-DEMAND DIGITAL TRAINING

    Our accreditation, business, and technical training designed specifically for APN Partners are available on-demand online. With our AWS free digital training, you can get started with APN Partner training solutions at your convenience.

    Accreditation Courses
    AWS Technical Professional – 3 hrs »
    AWS Business Professional – 3.5 hrs »
    AWS Cloud Economics – 3.5 hrs »

    Business Courses
    STP: Foundations – 3.5 hrs »
    Cloud Practitioner Essentials – 6 hrs »
    New STP: Amazon Connect – 90 mins »

    Business

    Project future-state cloud costs for Windows customers with TSO Logic
    Monday, Jul 27 – Register »

    Expand your reach with AWS Marketplace
    Tuesday, Aug 11 – Register »


    AWS CERTIFICATION NOW AVAILABLE ONLINE

    Our AWS Cloud Practitioner exam is now available to take in the comfort of your home or office through online proctoring. With this added convenience and flexibility, it’s now easier than ever to show your cloud skills are backed by an AWS Certification.

    Learn more »

  • How to get help for Emacs

    How to get help for Emacs

    This post is part of my 30 Days emacs challenge

    With years working with a variety of editors(vim, pico, nano, emacs). I find emacs to be capable of tasks such as text-editing, IDE, IRC, Organizer, mail client, source code management; yes emacs can do all these things with ease and is good at doing all of these.

    I do not mean that other editors can’t do the things which emacs can, and really do not want to start an editor war over it, but the ease of doing things with emacs outweighs other editors.

    The text editor comes with full-fledged documentation for common tasks for almost everything you want to do on your PC. 

    Before we go on exploring other topics for emacs, let’s start with knowing the emacs help system better.

    emacs is an acronym for Editor MACros has macros been written within emacs for some common tasks and is available to anyone for writing macros for their repetitive tasks.  In my later blogs, we will pick more on macros.

    Just for an overview, in emacs, A keyboard macro is a sequence of keys. For example, if you want to type C-n M-d C-d forty times, you can define a keyboard macro to do C-n M-d C-d, and then executing it 39 more times. 

    Emacs has the most robust help system available and all its help is available through a prefix of ‘C-h’ or F1. To know more on what is ‘C-‘ and ‘M-‘ in emacs please refer to my 30 Days emacs challenge

    Quickly find help in Emacs with its online documentation.

    • The Landing page, if you are very new: C – h t (opens the Emacs Tutorial)
    • Help on any function: F1 f function name
    • Help on summary of help commands: F1 F1
    • Help for topics: C – h a
    • Help on the topic in the Emacs index shows the first result: C – h i d m emacs <RET> i topic <RET>
    • Similar, but searched the text, instead of just indexes: C – h i d m emacs <RET> s topic <RET>
    • Emacs FAQ: C – h C -f
    • Available Emacs packages: C – h p

    Every emacs command has a name that is used as mapped with key bindings. Most emacs commands don’t have key bindings so the only way to learn them is to use them as commands, by emacs convention all the commands will consist of one or more words separated by ‘-‘. For eg. auto-fill-mode or manual-entry. So to enter a command, type M-x “enter the name of the command” RET (to execute), In case you change your mind to cancel the command pressing C-g (to cancel) will immediately cancel the command and put you into the main buffer. 

    Similarly apropos are the commands which may answer certain questions as “what are the commands for working with files?”. specifying an apropos pattern such as a word, a list of words, or regular expressions, each apropos command display a list of item that matches the pattern in a separate window.

    CommandsDescription
    C-h a *TOPICS*Searched for the command whose name matches the arguments
    C-h i d m *emacs* RET i *TOPIC* RETThis searches for the topic in the indices of the online emacs manual, and prints the first match
     ‘,’ to jump to the subsequent matches, we can also use regexes here.
    C-h i d m *emacs* RET s *TOPIC* RETSame as above, but instead of just searching the indices, it searches the manual too.
    C-h C-fDisplays the FAQ.
    C-h pDisplay all the emacs package based on the keywords.
    C-h bDisplay all active key bindings
    C-h c *key*show the name of the command it runs. (describe-key-briefly)
    C-h d *TOPICS* RETDisplay command and variables whose documentation matches the topic. (aprops-documentation)
    C-h eDisplay **Message** Buffer
    C-h f *function* RETDisplay documentation on the LISP function (describe-function)
    C-h hDisplay the ‘HELLO’ file
    C-h iRun info, the GNU documentation browser, the complete emacs document is available online in info
    C-h keyDisplay the name and the documentation of the command that the key runs. (describe-key)
    C-h lDescription of last 300 keystrokes. (view-lossage)
    C-h fDisplay documentation of the current major mode. (describe-mode)
    C-h nDisplay news of recent changes. (view-emacs-news)
    C-h pfind packages by topic keyword. ((finder-by-keyword)
    C-h rDisplay the emacs manual. (info-emacs-manual)
    C-h sDisplay the current contents of the syntax table, with an explanation of what they mean
     (describe-syntax)
    C-h tenter the emacs interactive tutorial. (help-with-tutorial)
    C-h v *var* RETDisplay the doc for the LISP variable var. (describe-variable).
    C-h w *command* RETShow which keys run the command named command. (where-is)
    C-h C *coding* RETDescribe the coding system. (describe-coding-system)
    C-h C RETDescribe the coding system currently in use.
    C-h F *COMMAND* RETEnter Info and go to node that documents emacs command *command*. (info-goto-emacs-command-node)
    C-h I *method* RETDescribe the input *method*. (describe-input-method)
    C-h K *key*go to the key-sequence document in Info. (Infp-goto-emacs-key-command-node)
    C-h L *Language-env* RETDisplay info on the character set, coding system, and input methods. (describe-language-environment)
    C-h S *Symbol* RETDisplay the info on the symbol *symbol* based on the programming mode you are using (info-lookup-symbol)
    C-h .Display message for the special text area. (display-local-help)
    **Apropos** 
    C-h a *pattern* RETSearch for a command whose names match the pattern.
    M-x apropos RET *pattern* RETSearch for functions(both interactive and non-interactive) and variables whose name matches the *pattern*
    M-x apropos-variable RET *pattern* RETSearch for user-option variables matching the *pattern*.
    M-x apropos-value RET *pattern* RETsearch for function whose definition match *pattern* and variable whose value matches *pattern*
    C-h d *pattern* RETsearch for function and variable whose documentation string matches *pattern*
    **Emacs help files** 
    C-h C-cDescribe the emacs copying condition. rules for copying and redistributing emacs. (describe-copying)
    C-h C-dDebugging in emacs. (view-emacs-debugging)
    C-h gDisplay general information about GNU Project. (describe-gnu-project)
    C-h C-mHow to order printed copies. (view-order-manual)
    C-h C-nTo see the emacs news and listing of new features. (view-emacs-news)
    C-h C-oHow to get the new version. (describe-distribution)
    C-h C-pTells us about the known emacs problems. (view-emacs-problems)
    C-h C-tDisplay the emacs TODO list or things that need to be done. (view-emacs-todo)
    C-h C-wDescribe warranty. (describe-no-warranty)

    Commands work in Help mode 

    SPCScroll forward
    DELScroll backward
    TABMove point forward to next cross reference
    S-TABMove point backward to the previous reference
    RETFollow a cross reference point.
    C-c C-cShow all documents of the symbol at the point.

    I am convinced the emacs has got the most extensive documentation an editor could ever have, the above table tries to cover as many things as possible but I am pretty sure, I would have definitely missed things, like this that once on IRC I had been suggested some lisp code to quickly take me to the help page and I missed it. Well, on many modern keyboards F1 works well for help.

    I tried to cover as much help command as possible in today’s blog posts which will come in handy for daily usage. Will soon be publishing text editing with emacs. 

  • Setting up … WordPress

    Today, after so many days of starting my blog, worked to set it up properly with colours and removing default widgets and setting some of my own. Though its not the best, but it looks a little owned, instead of the previous default one, Which was just like that, and looked kind of amateurish, Though I am sure, it must have been very difficult with the people to make something so simple, still it was the default and not customised as per my requirements. Hence here is the new look, not Smart, but not Bad either 😉

  • Bitcoin the start of the end for our current Monetary System?

    wonder who has build such a wonderful system, which eventually started to take on our usual currency, the best part is it being a global money, than just specific to certain countries, at-least we can save so much when doing the exchanges.

  • Hello, World from Org2Blog/wp-new-entry.

    This is my test blog post from Aquamacs.

    Well, i am just going to write a brief about how I made this post work.

    First of all, let me point you to this wonderful link, which list down the way to make emacs and org-mode work with wodpress and make this post possible.

    So, here what i did.

    I had this melpa and elpa repostiory already configured. so quickly did M-x package-install return; org2blog return
    some quick configuration changes in my .emacs file to incorporate the org2blog settings and wordpress cofiguration.
    (setq org2blog/wp-blog-alist
        '(("pablumfication"
           :url "http://username.wordpress.com/xmlrpc.php"
           :username "admin")))
    Now, we just need to login to our wordpress blog, M-x org2blog/wp-login return
    and start writing post with M-x org2blog/wp-new-entry return
    Happy blogging C-c p return.
  • Git Simplified.

    Set up with github. (Very good tutorial from Lifehacker)
    How the Heck do i use Github

    To remove the origin
    git remote remove origin

    To add origin
    git remote add origin https://github.com/<username>/<repository name>.git

    — Please do not add the “< >” while using the above command.
    for e.g. https://github.com/omps/webdevel.git

    use the origin as SSH and without authentication.
    you can follow the stack overflow question on this. 
    or can just add 
    “git remote add origin ssh://git@github.com/<username>/<repository name>.git

    To push to the repository.
    git push origin master
    If you have created the directly locally and wanted to push it to the github.com server, you may need to force the origin master.
    i did as “git push origin master –force”, please note that this may wipe your existing content.

    How to deploy keys.
    Github article.

    Generating keys
    A very good github tutorial related to generating keys for github.

    When the permission is denied.
    github’s own manual to fix it.

    More to come……. 

  • fortune cookies

    $ for i in {1..20}; do fortune -w ; sleep 3; clear; done

    if you are a slow reader adjust the sleep time accordingly.

  • a bash timer

    $ alias timer='export ts=$(date +%s);p='\''$(date -u -d @"$(($(date +%s)-$ts))" +"%H.%M.%S")'\'';watch -n 1 -t banner $p;eval "echo $p"'

  • processes thread of a user

    There are options with ps itself for better filter options, than may be doing it with grep, worth a try.

    $ ps -LF -u user

  • chown me to who you are

    use the other folder permission as reference. Here, changing the permission of all files in folder to the permission similar to the parent folder.

    chown –reference=. ./*

  • copy the keys

    easier than editing .ssh/authorized_keys file.

    ssh-copy-id user@host