While I have tried this on ubuntu-server, the steps should work for all Linux versions
I installed Docker on Ubuntu. It was super easy. But when I tried to run a docker command, it threw this error at me:
Got permission denied while trying to connect to the Docker daemon socket at unix:///var/run/docker.sock: Get http://%2Fvar%2Frun%2Fdocker.sock/v1.39/containers/json: dial unix /var/run/docker.sock: connect: permission denied
It’s not that I am trying to run something special. It happens for basic docker commands like docker ps as well.
The error is basically for the user not having the required permission to access the docker.sock file while running docker. The fix is pretty simple.
Fixing ‘Got permission denied while trying to connect to the Docker daemon socket’ error with Docker
Fix 1: Run all the docker commands with sudo
If you have sudo access on your system, you may run each docker command with sudo and you won’t see this ‘Got permission denied while trying to connect to the Docker daemon socket’ anymore.
$ sudo docker ps -a
CONTAINER ID        IMAGE               COMMAND             CREATED             STATUS                    PORTS               NAMES
13dc0f4226dc        ubuntu              "bash"              17 hours ago        Exited (0) 16 hours ago                       container-2
2d9a8c190e6c        ubuntu              "/bin/bash"         17 hours ago        Created                                       container-1
But running each and every docker command with sudo is super inconvenient. You miss adding sudo to the beginning and you’ll get a ‘permission denied’ error again.
Fix 2: Running docker commands without sudo
To run the docker commands without sudo, you can add your user account (or the account you are trying to fix this problem for) to the docker group.
First, create the docker group using groupadd command. The group may already exist but running the group creation command won’t hurt.
$ sudo groupadd docker
Now that you have the docker group, add your user to this group with the usermod command. I am assuming that you are trying to do it for your own user account and in that case, you can use the $USER variable.
$ sudo usermod -aG docker $USER
Verify that your user has been added to docker group by listing the users of the group. You probably have to log out and log in back again.
$ groups
singho adm cdrom sudo dip plugdev docker
If you check your groups and docker groups are not listed even after logging out, you may have to restart Ubuntu. To avoid that, you can use the newgrp command like this:
$ newgrp docker
Now if you try running the docker commands without sudo, it should work just fine.
Troubleshooting
In some cases, you may need to add additional permissions to some files especially if you have run the docker commands with sudo in the past.
You may try changing the group ownership of the /var/run/docker.sock file.
$ sudo chown root:docker /var/run/docker.sock
You may also try changing the group ownership of the ~/.docker directory.
# use the equivalent for your distribution
$ sudo apt install libvirt-daemon-system
Switch the Multipass driver to libvirt
First, allow Multipass to use your local libvirt:
# connect the libvirt interface/plug
$ sudo snap connect multipass:libvirt
Then, to switch the Multipass driver to libvirt, run:
# you'll need to stop all the instances first
$ multipass stop --all

# and tell Multipass to use libvirt
$ multipass set local.driver=libvirt
All your existing instances will be migrated and can be used straight away.
You can still use the multipass client and the tray icon, and any changes you make to the configuration of the instance in libvirt will be persistent. They may not be represented in Multipass commands such as multipass info, though.
Use libvirt to view Multipass instances
You can view instances with libvirt in two ways, using the virsh CLI or the virt-manager GUI.
To use the virsh CLI, launch an instance and then execute virsh list (see man virsh for a command reference):
[~ (master)]$ virsh list
 Id   Name     State
------------------------
 1    node1    running
 2    node12   running
 3    node13   running
 4    node4    running
Switch back to the default driver
To switch back to the default qemu driver, execute:
# stop all instances again
$ multipass stop --all

# and switch back to the qemu driver
$ multipass set local.driver=qemu
Amoral, cunning, ruthless, and instructive, this multi-million-copy New York Times bestseller is the definitive manual for anyone interested in gaining, observing, or defending against ultimate control – from the author of The Laws of Human Nature.
Robert Greene has distilled three thousand years of the history of power into 48 essential laws by drawing from the philosophies of Machiavelli, Sun Tzu, and Carl Von Clausewitz and also from the lives of figures ranging from Henry Kissinger to P.T. Barnum and extrapolated them with today’s world scenarios to help us understand more about the real people in the world we live in. The book explains the best ways to behave when in crisis. You must be very careful while reading this book and should not only learn the ideas that are helpful but also do learn others to defend yourself from what others could be capable of.
Some laws teach the need for prudence (“Law 1: Never Outshine the Master”), others teach the value of confidence (“Law 28: Enter Action with Boldness”), and many recommend absolute self-preservation (“Law 15: Crush Your Enemy Totally”). Every law, though, has one thing in common: an interest in total domination. In a bold and arresting two-color package, The 48 Laws of Power is ideal whether your aim is conquest, self-defense, or simply to understand the rules of the game.
Do not see the book as moral or immoral, morality as a concept is only applicable to a living, rational being which this book is not.
Most of what is written in the book is already happening and will continue to happen in this world as long as humanity exists. So, for the individual with strict moral principles, this book should not be viewed as a guide but rather as a cautionary warning of what other people are capable of.
To practice a good chunk of all these laws you have to assume a narcissistic, selfish personality and to some extent forsake aspects of your humanity. Do not read this book as a guide to attain power, but this is a clear cautionary tale on human psychology and a guide on how to avoid being snared by crafty individuals.
Though the title is confusing as it’s called a 5 Point Friday newsletter I compile this on Saturdays. From Last Saturday to This week’s Friday hence the name.
Below are a few of the things which happened last week i.e. from @17/07/2022 → 22/07/2022
Markets
Important!!!
ITS TIME TO FILE YOUR INDIVIDUAL ITR RETURN
List of documents needed for Individual ITR filings for FY 2021-22
Form 16
If a House Property loan is availed, a summary of total principal and interest paid during the year 2021-22, is supported by the loan statement
Details of Investments u/s 80C like LIC, NPS, etc. & Medical premium (80D), pertaining to FY 2021-22
Details of any FD interest received supported by Bank statement.
Details of capital gains from the sale of shares during the FY 2021-22 supported by the stockbroker statement
Personal bank account details
Income tax portal Login details
Things happened last week
Droupadi Murmu – 15th President of India
Droupadi Murmu scripted history on Thursday(21-07-2022) by becoming India’s first tribal President in the one-sided contest, defeating Opposition candidate Yashwant Sinha. Murmu, 64, won by an overwhelming margin against Sinha after receiving over 64 percent valid votes in a day-long counting of ballots of MPs and MLAs, comprising the electoral college, to succeed Ram Nath Kovind to become the country’s 15th president. Reports say that over 17 opposition MPs and more than 100 MLAs across India have cross-voted in favor of Murmu.
In 2015, Murmu became the first woman Governor of Jharkhand. The reticent leader lost her husband Shyam Charan Murmu and her two sons. Despite personal setbacks, Murmu continued her work toward social change.
Maharashtra Fast tracks Mumbai Ahmedabad Bullet Train
Maharashtra government on Thursday announced to expedite the Mumbai-Ahmedabad bullet train project. State Deputy CM said “The respective clearance for the projects are granted”
The Mumbai Ahmedabad project is expected to cost around 1,10,000 crores out of which 88,000 Crores are funded by Japan International Cooperation Agency(JICA). Over 70% of the Land required in Maharashtra for the project has been acquired in Thane and Palghar.
Bank mergers
The govt has announced a plan for the next public sector bank mergers after a detailed study has been commissioned on the outcome of the amalgamation of state bank runs. The plan is to have 4-5 large and strong banks as SBI. In 2019 10 state-run banks were merged into 4 banks and this time plan is to merge them from 12 banks to 4 large banks.
Govt Recruitment Plans
Union Minister of State for Personnel, Public Grievances, and Pensions Dr. Jitendra Singh informed of initiation of Special Taskforce plan for filling up the vacant posts as per central govt “10 Lakh Recruitment Plan’. The plan is to recruit 10 Lakh people in a mission mode in the next 1.5 years. In light of this, the CS and UPSC are working hard to grant mass promotions to 8,000 employees in one go. Of the total of 8,089 promoted employees, are from
Central Secretariat Service(CSS) – 4,734
Central Secretariat Stenographers’ Service(CSSS) – 2,966
Central Secretariat Clerical Service(CSCS) – 389
Celsius files for bankruptcy
Cryptocurrency lender Celsius Network has filed for bankruptcy in New York, becoming the latest company to fall victim to the current crypto bear run. This news comes days after another crypto lender, Voyager Digital, filed for bankruptcy on July 6.
Celsius has requested the authority not to allow customer withdrawals at this time, although they have $167 million in hand at the moment. This money will be used to provide liquidity for certain day-to-day operations during the restructuring process.
The company is currently under investigation by multiple American state regulators and authorities for the manner in which it unilaterally froze withdrawals from customer accounts in June.
Celsius had blamed “extreme” market conditions for the decision, leaving its 1.7 million customers in the lurch.
Understanding Payment Aggregators in India
The Story When you set up an e-commerce store, intending to sell your best art, product and things where you are expected to offer various payment options to potential buyers —think credit, debit cards, UPI, net banking, and digital wallets.
The buyer doesn’t care how it’s set up and wants a click of a button or swipe on their phone and get done with it. All they want to see is a payment success screen and have their brand new items delivered asap!
As a seller, you know the complexity of this outward simplicity which includes speaking with multiple banks and card issuers for integrating payments, working with payment gateways to handle the tech to ensure successful transactions, and setting up a merchant account and another bank account for actual cash to come in.
Here come the payment aggregators who will help you with these complex tasks, sets everything for you and you receive the money in your account when the transaction lifecycle is completed.
As we now understand the basics of Payment Aggregators(PA’s), let’s understand what happened this Friday. RBI granted the first-ever set of approvals for a PA license in India to fintech firms Razorpay, Stripe, Pine Labs, and 1Pay. All of them have helped sellers get their businesses online in the blink of an eye.
The problem? PAs handle a lot of money in their own accounts but do not come under RBI regulations. In 2020, when digital services boomed, the RBI decided that everyone who called themselves a PA needed to first get a license. RBI was concerned that many such companies are operating in a shady manner (by not verifying the details of merchants or by even indulging in crypto payments).
So they invited applications for the license and set out the criteria — including mandating a minimum net worth and enforcing the “fit and proper” rule — to make sure people who float payment aggregators continue to be in good standing without being implicated in legal matters. And finally, they evaluated these proposals (reports suggest that over 180 entities jumped in line to prove their worth) and extended the in-principal approval to a select few.
What is the rush to acquire PA License? We will use the case with Zomato — a food aggregator that wants to become a payments aggregator. Last year, the company set up Zomato Payments Ltd. To provide all kinds of payment options to the app’s users — including Buy Now Pay Later. why it wanted to make such a foray:
On the order value of ₹400, the (third-party) BNPL company pockets anywhere between ₹4–8. And what the BNPL company gains, Zomato loses. It does seem like a small amount think if you keep adding this sum over millions of orders? and it could be worth crores of rupees. And who wants to simply lose crores of rupees.
And, what happens if the RBI denies permission to entities who are doing PA duty?
Well, they’ll have to wind up their operation within 180 days.
Amazon.in – Buy The 48 Laws Of Power (The Modern Machiavellian Robert Greene, 1)
48 Laws of Power by Robert Greene
Amoral, cunning, ruthless, and instructive, this multi-million-copy New York Times bestseller is the definitive manual for anyone interested in gaining, observing, or defending against ultimate control – from the author of The Laws of Human Nature.
Robert Greene has distilled three thousand years of the history of power into 48 essential laws by drawing from the philosophies of Machiavelli, Sun Tzu, and Carl Von Clausewitz and also from the lives of figures ranging from Henry Kissinger to P.T. Barnum and extrapolated them with today’s world scenarios to help us understand more about the real people in the world we live in. The book explains the best ways to behave when in crisis. You must be very careful while reading this book and should not only learn the ideas that are helpful but also do learn others to defend yourself from what others could be capable of.
Some laws teach the need for prudence (“Law 1: Never Outshine the Master”), others teach the value of confidence (“Law 28: Enter Action with Boldness”), and many recommend absolute self-preservation (“Law 15: Crush Your Enemy Totally”). Every law, though, has one thing in common: an interest in total domination. In a bold and arresting two-color package, The 48 Laws of Power is ideal whether your aim is conquest, self-defense, or simply to understand the rules of the game.
Do not see the book as moral or immoral, morality as a concept is only applicable to a living, rational being which this book is not.
Most of what is written in the book is already happening and will continue to happen in this world as long as humanity exists. So, for the individual with strict moral principles, this book should not be viewed as a guide but rather as a cautionary warning of what other people are capable of.
To practice a good chunk of all these laws you have to assume a narcissistic, selfish personality and to some extent forsake aspects of your humanity. Do not read this book as a guide to attain power, but this is a clear cautionary tale on human psychology and a guide on how to avoid being snared by crafty individuals.
Change Default Apps in Android
A default app is the one that opens automatically when you try and do something on your phone—so when you click a hyperlink, for example, your default web browser app will open that link.
Take advantage of this flexibility by setting up the defaults as you want them. Go to Settings, go to Apps, and choose Default apps. Select any of the categories on the screen to see a list of installed apps that can take over default duties. For example, if you’d prefer to chat with friends via
Facebook Messenger, rather than your phone’s built-in SMS app, you can make Facebook’s product your default messaging app.
When you get angry do this
We all have things that upset us. People we know. People we don’t know. We get triggered, we get attacked. We see things happening. Stuff happens to us.
But before we get angry, we have to try to stop ourselves. Athenodorus counseled emperor Augustus to count all the letters of the alphabet before doing anything out of anger. In her book Walk Through Walls, the artist Marina Abromovich lays down this principle to aspiring artists. “If you get angry,” she writes, “stop breathing and hold your breath until you can’t hold it anymore, then inhale fresh air.”
Catch yourself. Catch your breath. Hold it in. Breathe out. Let it go. Relax. Move on. Don’t let it get to you—don’t let it make you do something contrary to virtue.
Health Tip
Most people don’t account for this. But lifestyle diseases like Diabetes and Hypertension can have a massive impact on your insurance premiums.
For instance, in Type-2 diabetes, insurance companies may ask you to shell out 20–30% more than healthy individuals. If it’s advanced diabetes or Type-1 diabetes, the insurance company won’t even extend a policy. And even when they do, they impose waiting periods that can last up to 3 years, during which the company won’t cover diabetes and diabetes-related complications.
So what do you do in such a situation? Well, there isn’t a lot that you can do away with the waiting periods if you buy a diabetic-specific plan. However, considering these are expensive, most people don’t go for them. So your best option, (and I know this sounds ridiculous), is to buy a plan when you’re healthy. Buy it when you’re healthy. Because once you have your policy in force, insurance companies can’t renegotiate if you develop a lifestyle disease. They can’t force you to pay more once you’re diagnosed with diabetes and they can’t impose waiting periods either.
Until Next Week
Thanks for sitting down and sharing your coffee time with me. I hope you have enjoyed this installment of my 5 Pointers, and I will see you next week. If you have any links you would like me to include please contact me and I might add them to a future newsletter. I wish you have a great week and as always friends.
This page contains affiliate links for Amazon products
Your Reading Habit Checklist
1) Experiment with different reading mediums.
2) Read anything you want.
3) Design an optimal reading environment.
4) Read 2-3 books at a time.
5) Start a reading streak.
6) Join a reading community.
7) Set a daily reading meeting.
8) pick a book and start reading
1) Experiment with different book reading mediums
There is no one size fit all, authors today print their books in many formats, if you like reading then find your true reading medium. Use a kindle, your phone, or your table if you love ebooks, if you love the feel and smell of paper read print books, if you don’t want to buy books, join your local library. If you want to listen to the book, take an audible subscription and enjoy audiobooks of all types.
Reading is not limited to reading a handful of bestsellers. You don’t have to read classic or bestselling books. You’re free to read anything and everything. Follow your genuine interests and curiosity. As @naval wisely said, “Read what you love until you love to read.”
3) Design your optimal reading environment
Don’t rely on willpower to keep you focused. Leave your phone, laptop, and other distracting devices in another room. It’s much easier to avoid distractions when there aren’t any than to try to power through ones that pop up.
4) Read 2-3 books at a time
When you have a lot of time & energy, read a more serious book. When you’re short on time or low on energy, read something more light. It’s important to have multiple books to choose from, this way you can match your mood to a book that suits it.
5) Start a reading streak
Grab a calendar & mark a big X on every day that you read. You’ll get a dopamine hit every time you read & you’ll be able to track your progress. Don’t worry if you miss a day, none of us are perfect and it will happen. The key is to never miss twice.
6) Find accountability through community
Visit Goodreads, r/books, #booktwitter, or one of the other million communities that exist on the internet. By surrounding yourself with readers, it will become a strong part of your identity & you’ll be motivated to keep reading.
7) Set a daily reading meeting
When you have an important event in your day, you don’t hope you’ll find time for it, you MAKE time for it. Do the same thing for reading. Add it to your calendar, set a reminder, and don’t let other activities interrupt your reading meeting.
8) Start reading
stop telling yourself “I’ll start reading when I have more free time.” Instead, follow these steps, and pick up a book today. Stick with it for a year, and even if you miss a day here or there, I guarantee that you’ll be proud you started reading today.
This list is inspired by Alex from Twitter, please follow him to get many such inspirational guide and tips.
This book was recommended by both James Clear and Morgan Housel so I had to check it out. If you’re looking for a book similar to The Psychology of Money but with more data, this is the book for you.
Here are a few short lessons from the book:
1) The Biggest Lie In Personal Finance
The biggest lie in personal finance is that you can be rich if you just cut your spending.
Financial gurus try to tell people that if they just stopped spending $5 a day on coffee, they could become millionaires. Here are a few problems with that advice:
They assume earning 12% returns when the historical average is closer to 8-10%. They assume the person will hold a 100% stock portfolio instead of a diversified portfolio. They assume the person will keep investing for decades and never sell any of it until they retire. And lastly, all of the gurus that share this advice didn’t get rich this way. They became rich through selling books, courses, etc.
Yes, you do want to cut spending if you’re living an extravagant lifestyle with unnecessary luxuries, but there’s no need to cut out your daily bagel or coffee order. Instead, the most consistent way to get rich is to grow your income and invest in income-producing assets (stocks, real estate, etc.).
2) How To Spend Money Guilt-Free
Do you ever feel guilty about spending money?
You think to yourself, “Oh I could invest this money instead of buying these new shoes or coat”?
Here’s a simple tip from Nick that will help you–it’s called the 2x Rule: Anytime you want to splurge on something, take the same amount of money and invest it as well.
So if you’re feeling guilty about buying a new suit work that cost $400, take that same amount and invest it into your stock portfolio.
Following this simple tip will help you stop feeling guilty about enjoying your money because you know you’re also investing in your future at the same time.
Also, if you’re super-rich or feeling in a good mood, you can use the 2x Rule to donate the money to charity. So if you’re feeling bad about buying a Rolex for $20,000, donate another $20k to your favorite charity.
3) Don’t Buy Individual Stocks
Here’s a scary stat: 75% of professional money managers working full-time with teams of analysts don’t outperform the market.
Here’s an even scarier stat: Research has shown that 4% of stocks from 1926 to 2016 created ALL the excess return for stocks.
So ask yourself, do you think you can find that 4% of stocks that will outperform the other 96%?
Maybe. But the odds aren’t in your favor. Even skilled professional investors have a hard time beating the market.
So what can you do instead? Simple–buy an index fund or ETF. This is usually a far better bet and you’re likely to end up with more money and less stress following this path than from trying to pick big winners among individual stocks.
Disclaimer: I’m not a financial advisor nor is any of this financial advice. Do your own research and talk to a professional.
✅ Actionable Advice:
1) Stop trying to cut out every small purchase:
Focusing on cutting out every small purchase isn’t the secret to becoming wealthy. Instead, focus on increasing your income and investing it in stocks, real estate, etc.
2) Follow the 2x Rule:
Every time you make a large purchase (ex: over $400), take that same amount and invest it into your portfolio. This way you’ll be able to enjoy your money today while also investing in your future.
3) Buy a basket of stocks instead of individual ones:
4% of stocks are responsible for all of the excess returns Buy an index fund or ETF and chances are you’ll get better returns and
I was browsing Twitter today and came across these interesting Twitter threads about Copywriting, Github, Mev, Trading, Extensions, Books, Tools, excel, webhosting
Personal MBA
A Twitter thread to give yourself a personal MBA in the coming 6 months
If you want to give yourself a personal MBA (in 6 months), read these books:
I am practicing inbox zero for which I follow a simple routine to check all my mails
move those mail to relevant labels/folders
delete the message
forward it to read later – Instapaper
add as task or a todo item – basically mark for followup
or reply
Basically, my email management workflow follows only these principles and I need to sort my mails based on the above rule
The Problem: Multiple devices with multiple mail clients
I use Windows, Linux, Mac and Iphone and an Android tablet. Following up with mails on these devices can be time consuming and often exhaustive and I spend most of my time searching for shortcuts to ease my mail management.
I tried to follow a simple routine and use the browser to access Gmail, reading emails on the browser can be difficult as I am not able to find any keyboard shortcut which can help me read the mail.
When I decide to use Thunderbird mail client on my windows machine I know a few excellent keywords but its helpful only till I am using thunderbird and once I move to use mac. then again the same issue starts searching for keyboard shortcuts for mac mail.
I have spent quite some time googling to find keyboard shortcuts for my different mail client as I use them.
So to save me from my regular arduous task of searching for keyboard shortcuts, I put this page to act as a golden source of the frequently used keyboard shortcuts I need while going through mail clients.
Keeping the list simple limiting to the tasks I want to do with my mails and really not an extensive list of keyboard shortcuts for all the activities you can do with the mail client
Please feel free to use the resource as your handy cheat sheet, and if you know the solutions or shortcuts for the empty slots do let me know and I will update the table.
I wanted to install multipass on my mac running 10.13.6 but the latest version of multipass doesn’t support Mac Os 10.13.6 so here I have prepared a list of supported version of multipass with the version of mac
Packages and applications downloaded from the internet could have malware added to them and it’s important we verify the packages we are downloading from the internet, this is now more necessary as we have so many opensource packages available and these packages can easily be tampered with or downloaded similar packages from unofficial repositories could contain harmful code in it.
Luckily, Packages from trusted open-source sites provide gpg signature which can be used to check and validate the authenticity of the packages
if you have installed git for windows, git comes with a git bash command which contains gpg package and the same can be used for validating the packages.
verifying emacs package downloaded from official gnu mirror.
$ gpg --verify emacs-28.1-installer.exe.sig emacs-28.1-installer.exe
gpg: Signature made Fri Apr 22 01:41:02 2022 IST
gpg:                using RSA key ECE77CF417C76C1ACFCE7C2B5B6135511580F007
gpg: Can't check signature: No public key
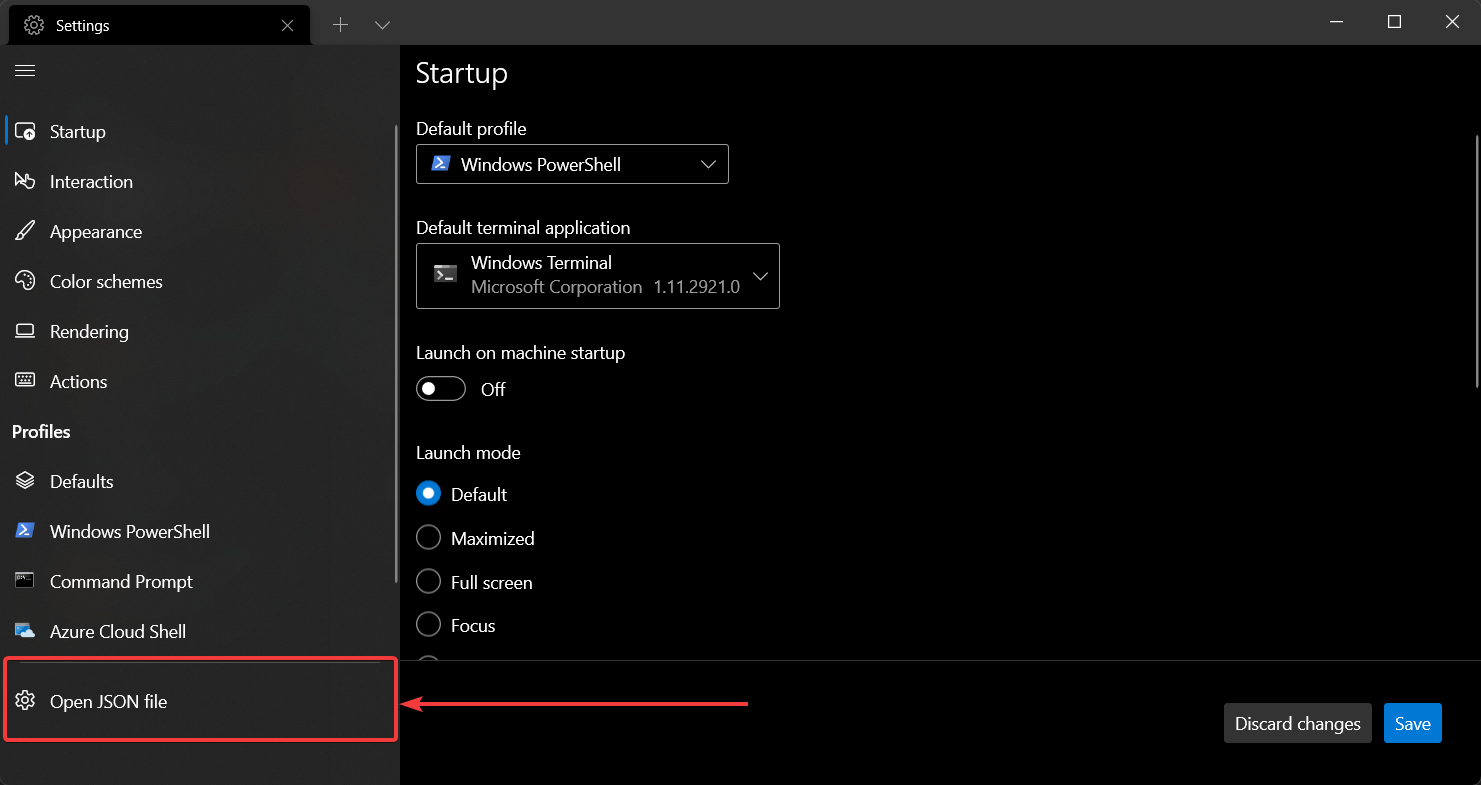
The article is about adding git-bash prompt to Windows Terminal, windows Terminal is a separate utility and should not be confused with the windows command prompt or windows power shell.
The Windows Terminal is a modern, fast, efficient, powerful, and productive terminal application for users of command-line tools and shells like Command Prompt, PowerShell, and WSL. Its main features include multiple tabs, panes, Unicode and UTF-8 character support, a GPU accelerated text rendering engine, and custom themes, styles, and configurations.
Git Bash is a source control management system for Windows. It allows users to type Git commands that make source code management easier through versioning and commit history. Bash is a Linux-based command line (that has been ported over to Windows) while Shell is a native Windows command line.
By Default Windows Terminal doesn’t come with git-bash added to it, one can add git-bash on the windows terminal following the below steps
Open settings with Ctrl+,
To make git-bash available you’ll need to append to the profiles options below to the "list": portion of the settings.json file:
{
    "$schema": "https://aka.ms/terminal-profiles-schema",

    "defaultProfile": "{00000000-0000-0000-ba54-000000000001}",

    "profiles":
    {
        "defaults":
        {
            // Put settings here that you want to apply to all profiles
        },
        "list":
        [
            <put one of the configuration below right here>
        ]
    }
}
Profile options
Uncomment correct paths for commandline and icon if you are using:
the guid can be used in in the globals > defaultProfile so you can press you can press CtrlShiftT or start a Windows terminal and it will start up bash by default
use environment variables so they can map to different systems correctly.
target git/bin/bash.exe to avoid spawning off additional processes which saves about 10MB per process according to Process Explorer compared to using bin/bash or git-bash
icon field to: "icon" : "C:\\Program Files\\Git\\mingw64\\share\\git\\git-for-windows.ico"
icon can also be referenced like this: "icon" : "%PROGRAMFILES%\\git\\mingw64\\share\\git\\git-for-windows.ico"
पर हित सरिस धर्म नहिं भाई। पर पीड़ा सम नहिं अधमाई॥
§ गोस्वामी तुलसी दास श्री रामचरितमानस उत्तरकाण्ड
दूसरों की भलाई के समान अन्य कोई श्रेष्ठ धर्म नहीं है मेरे भई और दूसरों को कष्ट देने के जैसा अन्य कोई पाप नहीं है | आवश्यकता पड़ने पर निस्वार्थ भाव से दूसरों को सहयोग देना परहित है|
Here are the 5 things which I had explored, learned, pondered in last week.
Read the book “Let’s talk Money” by Monika Halan
There are many books in the market to give you advice on trading and share markets and mutual funds but none of those book will teach you Money Management, you will get a lot of book which will give you money advice or financial advice like do this and don’t do this, like Rich dad, Poor Dad is a good inspiration book with its lots advice’s but never really telling the kind of questions you ask for buying a financial product, woven in the Indian context Monika Halan tries to take up on the financial instruments available in India. She encompasses her knowledge on Investing, creating a saving fund and plan for the future in this book. In the republished edition chapters on Covid has been added, She has hit the nail on the answers and the kind of questions you should be aware about while making a financial decision, whether its as simple as buying a insurance. You must know what kind of insurances are there and its impact on you on the long run. The book tries to help you with taking such decisions, Its a quite a detailed book and a recommended read.
Playtime for Kids
Bought this Wooden hanging ladder for kids to play, it’s a good exercise instrument and kids play hanging on them, and use it as swing . You can put this in your balcony provided your balcony is closed and kids really enjoy on this. I liked it’s features specially semicurved edges of wood, Other similar products on amazon has got rectangular or pointy edges, the wood is good heavy and has premium appeal to it and is of very superior quality. Rope quality is equally good. Gloves are an added advantage. Value for money. My kids liked it very much and enjoying a lot. This can easily be shifted to outdoor as well as indoor. You can get this from
3 Ghazals or Nazm to listen
3 Ghazals or Nazm to listen to if you get time and i thoroughly enjoyed listening to them, they all are available on prime music, but do listen with below singers only
बात निकलेगी तो फिर दूर तलक जाएगी – Jagjit Singh
तेरे ख़ुशबू में बसे ख़त, मैं जलाता कैसे – Jagjit Singh
आज जाने की जिद ना करो – Farida Khanum
Movie to Watch
For the movie I would recommend you to watch “Angamaly Diaries” its Malayalam movie and available on Netflix – Angamaly Diaries is one of the finest “Gangster” genre movie since RGV’s Sathya, but this is hilarious as well. The comic timing is impeccable. The movie captures the raw beauty of Kerala in a mélange of beautiful visuals, thumping music and absolutely raw & stunning natural acting, Most of the start cast is new. The story co-weaves it’s magic in the local dialect, food, music and culture of the people in Angamaly to the plot, while paying careful attention to every intricate detail, thus making it an highly engaging movie.
To the man who only has a hammer, everything looks like a nail
With changing times, our tools change and the use of it as well.
In the last couple of years, a constant question has buzzed the internet what’s the difference between Infrastructure-as-Code (IaC) and Configuration Management (ConfigMgmt) and when to utilize one of them.
Are they not doing the same thing?
Why invest in something new when the same thing can be done using ConfigMgmt tools?
Not only is that question coming up for engineers, but it’s also coming up for the companies that have created the Infrastructure-as-Code and Configuration Management platforms.
What’s the right decision and which direction should you go in?
In this blog post, I will try to touch on the differences between IaC and ConfigMgmt, along with the platform and tool you should use in what type of environment.
Difference between IaC and Configuration Management
Infrastructure as a Code
Configuration Management
IaC creates the System
ConfigMgmt configures the system
Clicking around UI is not a good way to spend engineer’s effort
Creating servers and systems is easier with virtualization, still everything is manual.
Infrastructure-as-Code is used to automatically create any service or system in the cloud or on-prem with code
Manually click around a GUI to provision servers and then you had to RDP or SSH into the servers to configure them
The code is typically a provisioning language, like JSON or YAML
Configuration Management is a way to configure servers. The configuration could be: Installing applications Ensuring services are stopped or started Installing updates Opening up ports
HashiCorp Configuration Language (HCL), is getting popular nowadays, which is a much easier and human-readable language compared to JSON and YAML to write infrastructure code
With servers growing, its not practical for a sysadmin to login to each server and configure them. Some identified this problem and build a tool to automate these tasks
IaC is also called Provisioning, as in a provisioning tool and is used interchangeably
The tool was Configuration Management
Some known IaC’s are: – Terraform – Plumi
Some known config management tools are: – Ansible – Puppet – Chef
Why can’t ConfigMgmt be used for IaC?
It can. Technically, one can use ConfigMgmt for IaC. The biggest problem using Config Management as an IaC is configuration drift.
Configuration drift is when someone automates a deployment using ConfigMgmt, and after some time a person goes into the server and changes the config. No one will know and there isn’t an actual blocker to stop the person from doing that. That causes config drift.
With IaC tools like Terraform, it’s different because Terraform has State files that essentially tell the server this is how you’re supposed to look. Don’t change for anyone.
When and where to use IaC vs Config Management?
In a startup and you’re primarily using Serverless and Container technologies to deploy apps. In practice, you don’t require Configuration Management. You just need an automated way to create the Serverless service or the containers. For example, you can use an IaC tool to create a Lambda Function.
ConfigManagement is mainly still useful with enterprises where there still are bare metal and virtualized servers, consider the organization like AWS that has a pretty important job; i.e. provisioning and configuring servers. Behind the scenes under the AWS UI hood is a server running on a virtualized platform, and that server needs to be configured with the dependencies that are needed to run AWS, setting up those things are done using ConfigMgmt.
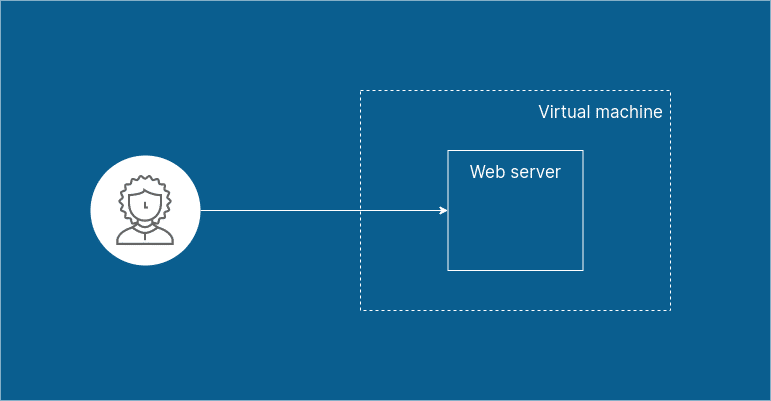
Localstack is a fully functional local cloud stack. LocalStack provides an easy-to-use test/mocking framework for developing Cloud applications. It spins up a testing environment on your local machine that provides the same functionality and APIs as the real AWS cloud environment.
We can run Lambda functions, store data to DynamoDB tables, feed events through Kinesis streams, put your application behind an API Gateway, and much more. And all this happens on your local machine, without ever talking to the cloud. Check out the Github repository.
Some of the benefits of using localstack
Enables a highly efficient dev&test loop. Deploy your application locally in Docker, within seconds
Its huge cost savings for development teams of all sizes. No cloud infrastructure needed
This Improve software quality through continuous integration. Stop rolling out untested changes.
Copy the below and paste it into a docker-compose.yml.
version: "3.8"

services:
  localstack:
    container_name: "${LOCALSTACK_DOCKER_NAME-localstack_main}"
    image: localstack/localstack
    network_mode: bridge
    ports:
      - "127.0.0.1:53:53"                # only required for Pro
      - "127.0.0.1:53:53/udp"            # only required for Pro
      - "127.0.0.1:443:443"              # only required for Pro
      - "127.0.0.1:4510-4530:4510-4530"  # only required for Pro
      - "127.0.0.1:4566:4566"
      - "127.0.0.1:4571:4571"
    environment:
      - SERVICES=${SERVICES-}
      - DEBUG=${DEBUG-}
      - DATA_DIR=${DATA_DIR-}
      - LAMBDA_EXECUTOR=${LAMBDA_EXECUTOR-}
      - LOCALSTACK_API_KEY=${LOCALSTACK_API_KEY-}  # only required for Pro
      - HOST_TMP_FOLDER=${TMPDIR:-/tmp/}localstack
      - DOCKER_HOST=unix:///var/run/docker.sock
    volumes:
      - "${TMPDIR:-/tmp}/localstack:/tmp/localstack"
      - "/var/run/docker.sock:/var/run/docker.sock"
In case the formatting is not proper the same can be downloaded from here.
Open PowerShell from the folder where above docker-compose.yml is kept.
Run docker-compose up command.
Builds, (re)creates, starts, and attaches to containers for all LocalStack services.
Now you can work with Localstack services like S3.
By default the WooCommerce product page comes with a classic layout and doesn’t have much flexibility, the product page usually looks boring and non-responsive. For example look at this page,
which has a boring frontend and a lot of text in the description, this also doesn’t look very appealing. Now pages like this will make your site visitors run away. To solve this we will add Gutenberg capabilities to our blog page so our page should look great.
Now to add the Gutenberg feature to your woocommerce, we will need a free plugin called code snippet.
Once the plugin is activated go to the plugin in your right-hand sidebar, add a new snippet
Give a cool name to your snippet and add the below code
// enable gutenberg for woocommerce
function activate_gutenberg_product( $can_edit, $post_type ) {
 if ( $post_type == 'product' ) {
        $can_edit = true;
    }
    return $can_edit;
}
add_filter( 'use_block_editor_for_post_type', 'activate_gutenberg_product', 10, 2 );

// enable taxonomy fields for woocommerce with gutenberg on
function enable_taxonomy_rest( $args ) {
    $args['show_in_rest'] = true;
    return $args;
}
add_filter( 'woocommerce_taxonomy_args_product_cat', 'enable_taxonomy_rest' );
add_filter( 'woocommerce_taxonomy_args_product_tag', 'enable_taxonomy_rest' );


REMOVE DESCRIPTION HEADING

// Remove the product description Title
add_filter( 'woocommerce_product_description_heading', '__return_null' );
Once you have added your code make sure you select “Run snippet everywhere”
Give a nice little description to your snippet.
Save and activate your snippet.
With Gutenberg blocks enabled in our product, we can do some amazing things for making our product look awesome, this is how the page looks now.
There are a couple of things I decided to do today, to make my affiliate website look more appealing.
I am writing a top-10 washing machines page for my blog. I wanted to add a price column which is the price of the product from amazon.in on the date when the product is fetched.
A few of the things which I wanted to do is to ensure to add the price code to be added from my amazon product page.
For getting the amazon product onto my blog page I am using wzone importer and wp-automatic
I have enabled woocommerce on my website, with wzone and wp-automatic, I am fetching products from amazon.in and adding them as an affiliate product on my website.
There is no woo_commerce shortcode to just fetch the prices, the generate blocks also don’t provide the capability to add the same to the review page
So I created a child theme from my parent theme and added the below code in my functions.php page
function custom_price_shortcode_callback( $atts ) {

    $atts = shortcode_atts( array(
        'id' => null,
    ), $atts, 'product_price' );

    $html = '';

    if( intval( $atts['id'] ) > 0 && function_exists( 'wc_get_product' ) ){
        // Get an instance of the WC_Product object
        $product = wc_get_product( intval( $atts['id'] ) );

        // Get the product prices
        $price         = wc_get_price_to_display( $product, array( 'price' => $product->get_price() ) ); // Get the active price
        $regular_price = wc_get_price_to_display( $product, array( 'price' => $product->get_regular_price() ) ); // Get the regular price
        $sale_price    = wc_get_price_to_display( $product, array( 'price' => $product->get_sale_price() ) ); // Get the sale price

        // Your price CSS styles
        $style1 = 'style="font-size:40px;color:#e79a99;font-weight:bold;"';
        $style2 = 'style="font-size:25px;color:#e79a99"';

        // Formatting price settings (for the wc_price() function)
        $args = array(
            'ex_tax_label'       => false,
            'currency'           => 'INR',
            'decimal_separator'  => '.',
            'thousand_separator' => ' ',
            'decimals'           => 2,
            'price_format'       => '%1$s %2$s',
        );

        // Formatting html output
        if( ! empty( $sale_price ) && $sale_price != 0 && $sale_price < $regular_price )
            $html = "<del $style2>" . wc_price( $regular_price, $args ) . "</del> <ins $style1>" . wc_price( $sale_price, $args ) . "</ins>"; // Sale price is set
        else
            $html = "<ins $style1>" . wc_price( $price, $args ) . "</ins>"; // No sale price set
    }
    return $html;
 }
 add_shortcode( 'product_price', 'custom_price_shortcode_callback' );
Now adding this simple shortcode on my page, provides me with the quick price from the product page of my website.
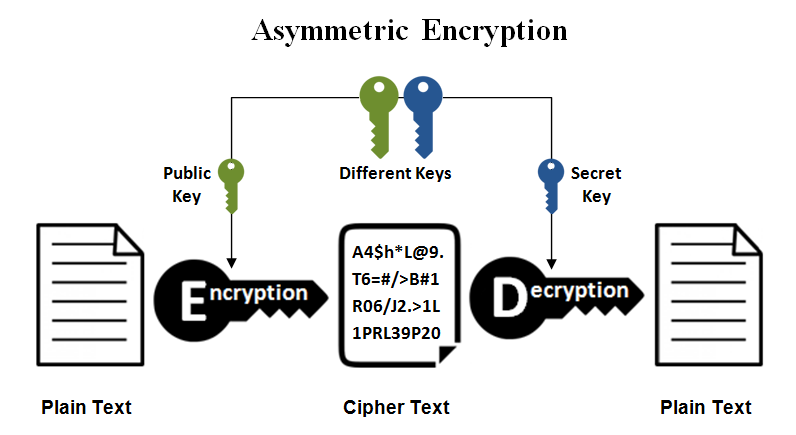
will actually produce a public – private key pair. The pair is stored in the generated mykey.pem file.
openssl rsa -in mykey.pem -pubout > mykey.pub
will extract the public key and print that out. Here is a link to a page that describes this better.
openssl rsa -in key.pem -pubout -out pubkey.pem
To get a usable public key for SSH purposes, use ssh-keygen:
ssh-keygen -y -f key.pem > key.pub
This public key format is compatible with OpenSSH. Append the public key to remote:~/.ssh/authorized_keys and you’ll be good to go
ssh-keygen -y [-f input_keyfile]
-y This option will read a private OpenSSH format file and print an OpenSSH public key to stdout.

docs from SSH-KEYGEN(1)
This weekend, I was working on a personal project this requires me to send personalized certificates to all participants over email.
Composing mail, Adding attachments, Writing messages Adding email addresses, and sending to the recipient is tedious and time-consuming if I need to do this for multiple users.
Google sheets provide a nice feature to automate this process using “script-editor”. The first step is to collect user details using google forms, once we have those details we create a sheet for those details.
For creating certificates I used canva tool (an online tool) to create certificates, use the existing templates and the names in the certificates from the name in the form you created.
Google forms created the sheet and I uploaded the certificates to the google drive folder, these certificates will now be sent to each recipient from the sheet.
The next step is to configure google sheets to send mail
We will not use the sheet created by form, instead will create a new sheet.
Go to chrome browser and type sheets.new in the URL bar, this will create a new spreadsheet for adding our data.
Here we need to add the attachments field from google drive. The catch here is to add the file-id in the attachment column, which means, we need to collect the ‘file-id’ of all the files which we want to add as an attachment for every row.
The manual step is to right-click on the file and click on the get link to get the link of the file. The box marked in red is the file id.
Doing this for multiple files could be time-consuming, so we take google sheets script editor’s help again and create a new sheet to collect the data.
Go ahead and create a new sheet, open tools -> script editor
/* modified from @hubgit and http://stackoverflow.com/questions/30328636/google-apps-script-count-files-in-folder
for this stackexchange question http://webapps.stackexchange.com/questions/86081/insert-image-from-google-drive-into-google-sheets by @twoodwar
*/
function listFilesInFolder(folderName) {

   var sheet = SpreadsheetApp.getActiveSheet();
   sheet.appendRow(["Name", "Date", "Size", "URL", "Download", "Description", "Image"]);


//change the folder ID below to reflect your folder's ID (look in the URL when you're in your folder)
    var folder = DriveApp.getFolderById("Add your folder id here");
    var contents = folder.getFiles();

    var cnt = 0;
    var file;

    while (contents.hasNext()) {
        var file = contents.next();
        cnt++;

           data = [
                file.getName(),
                file.getDateCreated(),
                file.getSize(),
                file.getUrl(),
                "https://docs.google.com/uc?export=download&confirm=no_antivirus&id=" + file.getId(),
                file.getId(),
                file.getDescription(),
                "=image(\"https://docs.google.com/uc?export=download&id=" + file.getId() +"\")",
            ];

            sheet.appendRow(data);


    };
};
Add the folder id in the above code, we get the folder id the same way we did for file id.
Run the script, it will get the file id and its name along with file size, file link, and thumbnail image of all files from the specified folder, copy the file-id and align it with the proper name in the firs sheet we created for sending mail.
Our sheet is now ready with all the details and will look more or less like below.
Go to tools -> script editor and add the code for sending mail.
The code below is going to pick the email id from the first column and rename the file attachment with the name of the user from the second column and sent the mail to the user.
after sending mail to each user, the script will update the last column with the value EMAIL_SENT, this is added to avoid sending duplicate mail to the same recepient
// This constant is written in column C for rows for which an email
// has been sent successfully.
var EMAIL_SENT = 'EMAIL_SENT';

/**
 * Sends non-duplicate emails with data from the current spreadsheet.
 */
function sendEmails2() {
  var sheet = SpreadsheetApp.getActiveSheet();
  var startRow = 2; // First row of data to process
  var numRows = 56; // Number of rows to process
  // Fetch the range of cells A2:B3
  var dataRange = sheet.getRange(startRow, 1, numRows, 6);
  // Fetch values for each row in the Range.
  var data = dataRange.getValues();
  for (var i = 0; i < data.length; ++i) {
    var row = data[i];
    var emailAddress = row[0]; // First column
    var emailSent = row[5]; // Sixth column
    // var certificateURL = row[4];
    var name = row[1];
    var id = row[4];
    var certificateBlob = DriveApp.getFileById(id).getBlob().setName(name + "_certificate");
    // var certificateBlob = UrlFetchApp.fetch(certificateURL).getBlob().setName(name + "_certificate");
    var comp_name = row[3] // Cometetion Name, Fifth Column
    var subject = 'Thank you for participating in ' + comp_name + ' Competition';
    if (emailSent !== EMAIL_SENT) { // Prevents sending duplicates
      MailApp.sendEmail({
        to: emailAddress,
        subject: subject,
        htmlBody: "Thank you for participating, Please find you e-Certificate! <img src='cid:certificate'> <br> <br>",
        inlineImages:
        {
          certificate: certificateBlob
        }
      });
      sheet.getRange(startRow + i, 6).setValue(EMAIL_SENT);
      // Make sure the cell is updated right away in case the script is interrupted
      SpreadsheetApp.flush();
    }
  }
}
We all love music, be it gym, during work, or just chilling out, I do use amazon prime and spotify but there are times when we face internet trouble and when we do get grumpy when not able to listen to some good numbers, for such times I keep some music downloaded and play them from my Bluetooth speakers, that way I don’t have to do a lot of pairing from multiple devices with internet.
I use youtube-dl which is a freely available tool based on python, I try to keep things simple, and on my android phone downloaded termux which helps me run Linux commands and provides me with a development environment.
The next step is to allow termux permission to your storage where you would keep your music which can then be accessed by your music player.
I won’t go into details on how to set up termux and allow termux access to your phone storage, you can google search and can get a lot of articles to do this.
To convert music to mp3 you may need to install two packages such as avconv and ffmpeg you can install any of these or both, youtube-dl defaults to converting using avconv.
$ sudo apt install ffmpeg avconv
I try to keep my work env clean so I create a virtual env.
Once you have youtube-dl installed move to the directory where you want to download your mp3’s
$ cd /path/to/download/music
$ youtube-dl -x --audio-format mp3 https://www.youtube.com/watch?v=jwD4AEVBL6Q
The command will download the music you want, you can also give the playlist which you want to download, just ensure to add it in " " otherwise, this downloads only one file as there is ‘&’ in the URL which sends your command in the background and downloading only one file.
If you are a fan of cover art, you may want to try and download the album cover as well.
It is possible that you may not like all the songs in other people’s playlists. So what if you want to download many songs from different playlists? Well a workaround on that matter is to get a list of URLs in a single file.
Write the URLs in a file called videos.txt and make sure to keep one URL at a line. Then you can use the following "for" loop to download the songs:
$ for i in $(<videos.txt); do youtube-dl -x --audio-format mp3 $i; done
In the emacs community, this is often a frequent question how can you install packages, while M-x package-list and M-x package-install can be a lot of help, you do not want to do it every time you install emacs, a better way is to add your packages in init.el and let emacs programmatically download and install you most frequent used packages.
Here is a quick step on how you can achieve this with your init.el file is to use package-refresh-contents, but this will only work with the packages already present in your emacs library, basically this will just refresh those packages to their latest version and that’s it.
But how we can download packages which we need on a machine where we are setting emacs for the first time.
The first step is to add your elpa and melpa repositories, I do this by adding the following in my inti.el file, this add the repos and initialize them
This provides me with the ability to avoid touching my main package installation code every time and I need to simply update my package list variable, which does package-install in my next emacs run, or I just call eval-buffer and reread the init.el file.


